 If you are looking for a easy way to backup your files and folders on your Ubuntu desktop, use Pybackpack GNOME graphical user interface backup tool.
Pybackpack stands for “Python Backpack”.
This uses rdiff-backup in the backend to take the backup. When you execute the rdiff-backup for the 1st time, it takes a full backup, and for later backups, it takes backup of only the changes. This makes it very effective to restore from several point in time, without having to keep several full backups.
As we discussed earlier, taking backup is the 3rd reason why every sysadmin should be lazy.
1. Install Pybackpack
# sudo apt-cache search pyback
pybackpack - user friendly file backup tool for GNOME

# sudo apt-get install pybackpack
Once you’ve installed it, launch it from System -> Administration -> File Backup Manager, as shown below.
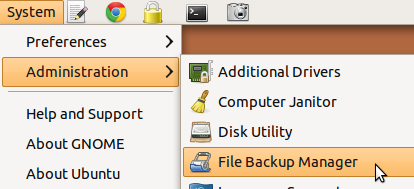
2. Backup Entire Home directory to a CD or DVD
From the home tab, if you click on ‘GO’, it will create an iso image of your home directory, and try to burn it to a CD or DVD. If your CD/DVD burner is working properly, just insert a black CD and click “Go” from the home tab, to take a backup of your home directory.
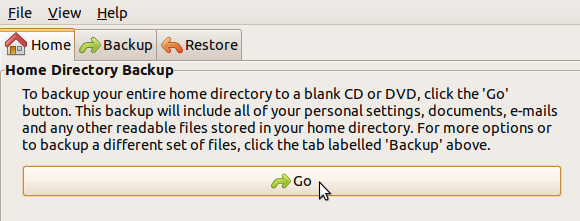
3. Take a Local Backup Using custom Options
Most of the time, you want to customize your backup. i.e You’ll specify exactly what files and folders you want to include/exclude in your backup set.
To do this, you should first create a backupset and specify what needs to be included in the backup set.
From the Backup tab, select “New backup set” from the dropdown list and click on ‘Edit”, which will display a create backupset wizard.

In the create backupset wizard -> Enter the name and description of the backup set -> select “Local file system” from the dropdown list -> Enter the destination directory where the backup needs to be stored, as shown below. In this example, I created a backup set called “My Dropbox” with the backup destination directory as /home/ramesh/backup.
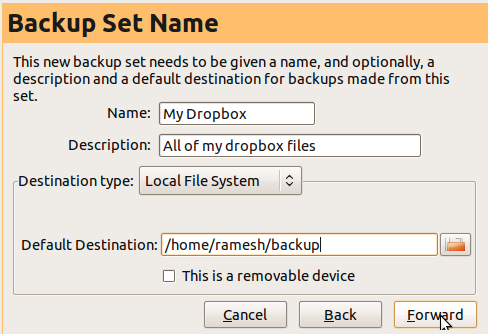
Next, add the files and folders that needs to be added or excluded from this backup set. In this example, I’ve included the “/home/ramesh/Dropbox” directory, and excluded the “/home/ramesh/Dropbox/Photos” directory. So, this backupset will contain backup of all my files/folders under /home/ramesh/Dropbox except the “Photos” subdirectory.
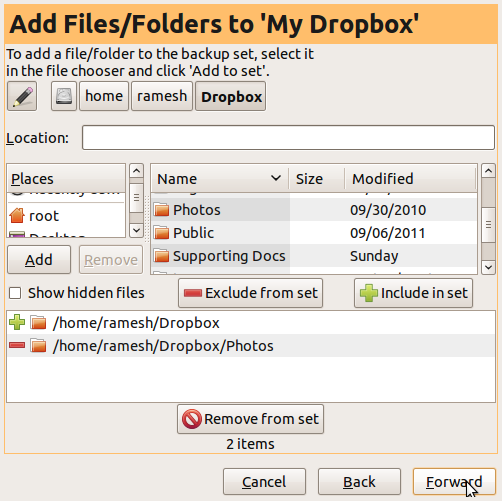
Finally, click on “backup”, which will create the backup, based on the new backup set that was created.
As we mentioned earlier, this uses rdiff-backup to keep track of incremental backups. So, if you do “ls -l” you’ll also see a directory called “rdiff-backup-data” in your backup destination directory.
$ ls -l /home/ramesh/backup/
total 8
drwxr-xr-x 3 ramesh ramesh 4096 2011-04-24 16:25 home
drwx------ 3 ramesh ramesh 4096 2011-09-24 09:46 rdiff-backup-data
Note: Next time when you take a backup of this backup set, pybackpack (which uses rdiff-backup), takes backup of only the changes. This is very effective in terms of both space and bandwidth.
4. Restore from Your Local Backup
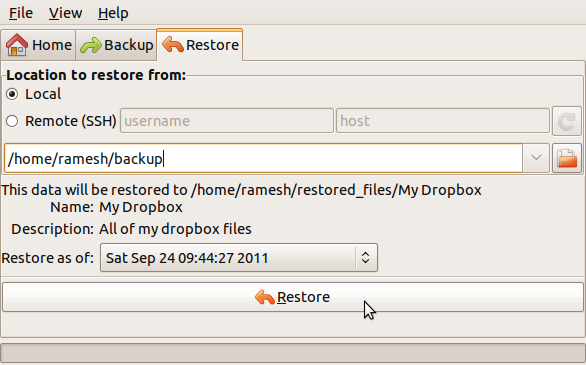
To restore form your previous backup, go to “Restore” tab -> select “Local” -> enter your backup destination directory. This will automatically detect the backupset name/description of the backup that is stored under this directory.
As you see below, immediately after I entered “/home/ramesh/backup” as my backup location, it picked up the backup set name as “My Dropbox” and its description.
This will also display a dropdown box for “Restore as of”, which will contain the date and time of all the previous backup you took for this particular backupset. Choose the appropraite date/time of the backup that you want to restore, and click on ‘Restore’.
Please note that when you restore, it will not overwrite the files/folders in your original location, instead it will create a folder called “restored_files” under you home directory and restore it there. In this example, it restores it to ‘/home/ramesh/restored_files/My Dropbox’ folder.
5. Backup to a Remote Location using SSH
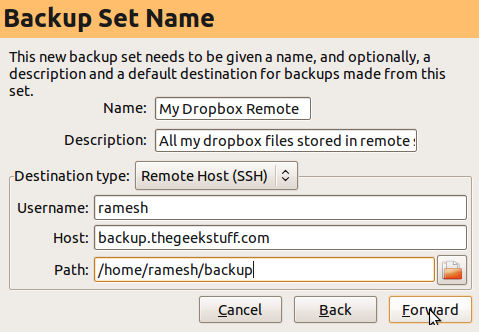
Instead of storing the backup on your local server, you can also store it on a remote server directly. To do this, create a new backup set, and specify the hostname, username, and backup directory location of the remote host where you want to store the backup, as shown below.
To restore from a backup that is located on the remote server, go to “Restore” tab -> select “Remote” -> enter the username, hostname, and the destination backup directory -> Click on “Refresh” icon, which will pick-up the backupset name automatically -> Select the “Restore as of” -> click on “Restore”.


 My name is Ramesh Natarajan. I will be posting instruction guides, how-to, troubleshooting tips and tricks on Linux, database, hardware, security and web. My focus is to write articles that will either teach you or help you resolve a problem. Read more about
Comments on this entry are closed.
Hi, Running 64 bit Ubuntu 11.04 – the Natty Narwhal, everything updated
sudo apt-get install pybackpack
Some packages could not be installed. This may mean that you have
requested an impossible situation or if you are using the unstable
distribution that some required packages have not yet been created
or been moved out of Incoming.
The following information may help to resolve the situation:
The following packages have unmet dependencies:
pybackpack : Depends: python-brasero but it is not going to be installed
E: Broken packages
sudo apt-get install python-brasero
Reading package lists… Done
Building dependency tree
Reading state information… Done
Some packages could not be installed. This may mean that you have
requested an impossible situation or if you are using the unstable
distribution that some required packages have not yet been created
or been moved out of Incoming.
The following information may help to resolve the situation:
The following packages have unmet dependencies:
python-brasero : Depends: libbrasero-media1 (>= 2.31.91) but it is not going to be installed
E: Broken packages
sudo apt-get install libbrasero-media1
Reading package lists… Done
Building dependency tree
Reading state information… Done
Some packages could not be installed. This may mean that you have
requested an impossible situation or if you are using the unstable
distribution that some required packages have not yet been created
or been moved out of Incoming.
The following information may help to resolve the situation:
The following packages have unmet dependencies:
libbrasero-media1 : Depends: brasero-common (< 2.33) but 3.0.0-1ubuntu4~natty1 is to be installed
E: Broken packages
Hi,
Did you try to istall source code , then compile under redhat ?
This dependence was fix in the unstable pybackpack package, you can download from here: http://packages.debian.org/sid/pybackpack and it’s working for me!!
Cheers!!