If you have multiple web servers running HTTP, you can offload the HTTPS SSL function to a hardware load balancer, which will do both the functions of load balancing the traffic between the nodes, and performing the HTTPS.
In this tutorial, we’ll use the following example, where node1 and node2 both runs only HTTP. The HTTPS is offloaded to Big-IP F5, which will also do load balancing.
- Virtual Server (created in F5): https://www.thegeekstuff.com (192.168.102.2)
- Node 1 : http://node1.thegeekstuff.com (192.168.101.2)
- Node 2 : http://node2.thegeekstuff.com (192.168.101.3)
1. Upload SSL Certificate and Key
First, you should have a SSL certificate and key generated for your site. Once you have that, upload it to the F5 as shown below.
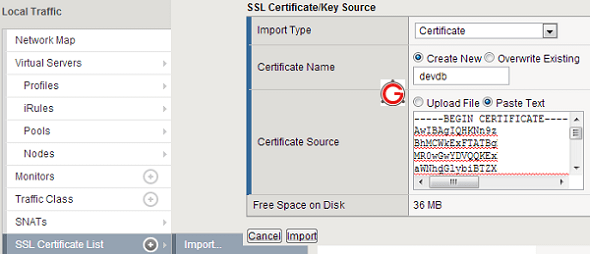
Login to F5 -> Go to Local Traffic -> SSL Certificate List -> Import, which will show the following UI. Here, do the following:
- Import Type: Select certificate
- Certificate Name: Select “Create New” in the radio button, and enter the name of the certificate. (for example, devdb)
- Certificate Source: Select “Paste Text”, and paste the content of your SSL certificate here.
- Click on ‘Import’
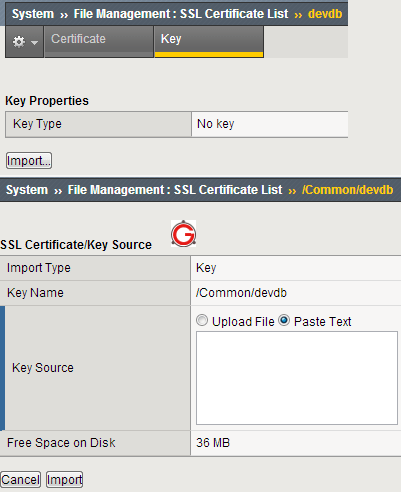
Once you import the certificate, you should also import the key. Go to Local Traffic -> SSL Certificate List -> You should see the certificate you just created here (i.e devdb). Select the certificate, and click on the “Key” tab on the top, which will display the following screen. Click on Import here.
From here, do the following:
- ImportType: Key
- KeyName: This will display your certificate name.
- Key Source: Select “Paste Text” radio button, and paste the content of your key here.
Now, if you go to “Certificate List”, you’ll see the “devdb”, but under the “Contents” column it will say “Certificate and Key”, which indicates that you’ve uploaded both certificate and key.
Note: If you are still using older version, upgrade Big-IP F5 Software to new version as we discussed earlier.
2. Create F5 SSL Profile
Next, you should create a client SSL profile. Go to “Local Traffic” -> Profiles -> SSL -> Client, which will display all the current SSL profiles,
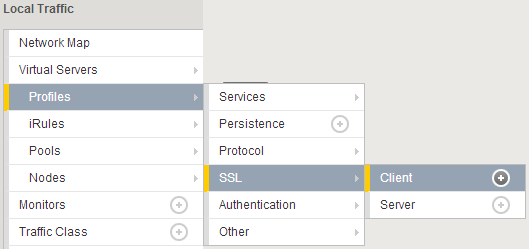
Click on “Create” button on the top right corner, which will display the following:
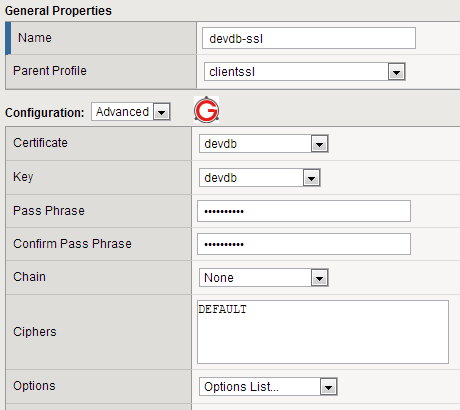
- Name: Enter the SSL profile name. For example: devdb-ssl
- Parent profile: Leave it default at clientssl.
- If you have a passphrase to enter for your key, you should do it here, by selecting “Advanced”. If not, just “Basic” information is good.
- Certificate: Select the certificate you created above. i.e devdb
- Key: Select the key you created above. i.e devdb
- Passphrase: The passphrase for the SSL key.
- Leave all other fields default.
3. Create F5 Pool
After you create the SSL certificate/key, and SSL profile, it is time to create a pool, and assign members to it.
Go to “Local Traffic” -> Pools -> Pool List as shown below.
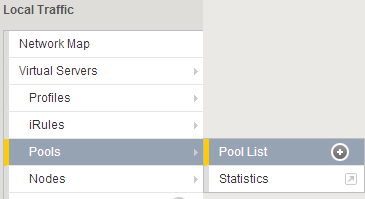
From here, click on “Create” button on the top right corner, which will display the following:
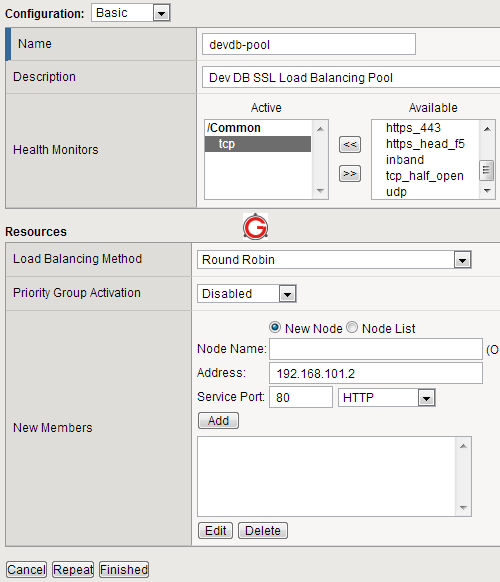
- Configuration: Leave it as “Basic”
- Name: Enter the pool name. For example, devdb-pool.
- Description: Enter some meaningful info here
- Health Monitors: Select “tcp” from the “Available” list.
- Load Balancing Method: Select “round robin”
- New Members: Click on “New Node” radio button, and enter the ip-address of the node1.
- Port: Select HTTP here, as the nodes themselves will be running only on HTTP. (If you are doing HTTPS passthrough, you’ll select HTTPS her. But, we are not doing that in our example)
- Add: Click on add to add the node1. Repeat the same process and add “node2”.
- Once you’ve added both the nodes, click on “Finished”, which will create this new devdb-pool.
4. Create F5 HTTPS Virtual Server
Finally, it is time to create the HTTPS virtual server that will use the pool we created above.
Go to “Local Traffic” -> Virtual Servers -> Virtual Server List as shown below.
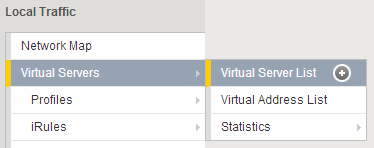
From here, click on “Create” button on the top right corner, which will display the following:
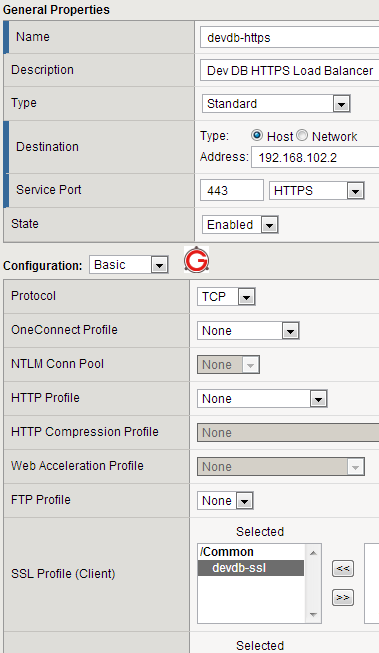
- Name: Enter the name of the virtual server. For example, devdb-https
- Description:
- Type: Select standard
- Destination: Select “Host”, and enter the name of the virtual server. (For example, 192.168.102.2). So, if someone comes to 192.168.102.2 on SSL, it will get redirected to one of the nodes in the devdb-pool.
- Service Port: Select HTTPS, as incoming request to the virtual server itself will be in SSL.
- SSL Profile (Client): select “devdb-ssl” from the list.
- Leave everything else default on this screen and create the virtual server.
After the above setup, If you go to https://192.168.102.2, F5 Big-IP will do the SSL encryption and transfer the traffic to one of the HTTP nodes.


 My name is Ramesh Natarajan. I will be posting instruction guides, how-to, troubleshooting tips and tricks on Linux, database, hardware, security and web. My focus is to write articles that will either teach you or help you resolve a problem. Read more about
Comments on this entry are closed.
In F5, can I do just the load balancing without HTTPS offloading?
Also, does it support any dynamic addition/deletion of nodes based on some custom logic. For example, I want to add 6 nodes to the load balancing. But, only 5 should be active at any given time. The 6th one should become active only if any one of the 5 nodes fails.
Ramesh thank for you,
its very useful.
I read your paper all 245 paper from 2011/5.
all of them is very useful for me;
Cheers Mohammad,
hi, I have a situation which describes below:
Https:\\URL1 will go thru F5 (F5 should have SSL cert.) and from F5 it will go to Web server http:\\URL2 and from Web server it go back to F5 and from F5 it will go to the Web server with the services and go to DB server then back to Web server with the services and it go to F5 to go back to Https:\\URL1
How can I set this up? Please help.
Thanks.
Ramesh Excellent Article, Thanks For Posting.
Thumbs up but I would like to ask what about load balancing application that require unicast mode?
Very good article. Thanks