
If your organization is using Google Apps gmail, and if you are considering to migrate it to Microsoft Office 365, this tutorial will explain everything that you need to know to complete the migration.
The following are the high-level steps that are covered in this tutorial:
- Sign-up for Office 365 and create admin account
- Verify Your Domain in Office 365
- Create User Mailboxes and assign Office 365 License
- Create Migration Endpoints with Gmail IMAP
- Create List of Users for Migration Batch
- Create Migration Batch to Migrate Mailboxes
- Update DNS – Repoint MX Records to Microsoft
1. Sign-up for Office 365 and create Admin Account
- Office 365 Business Essentials – (Price: $5 per mailbox) Use this if you just want to use Email. You’ll get office online including office 365 email with 50GB per mailbox. 1 TB of file storage. HD video conferencing.
- Office 365 Business – (Price: $8.25 per user) This doesn’t have office online email. You can add this on top of business essential if you like. You’ll get fully installed Office on PC/Mac. This also includes Office apps on tablets and phones.
- Office 365 Business Premium – (Price: $12.50 per user) This is a combination of the above two options.
If you are not sure about which option to choose, go with business essential and later you can add other things on top of it.
Detailed plan and pricing information here: Compare Office 365 Business Plans
Once you sign-up, you’ll create an account for yourself in office 365. The first account that you create will be an admin account. Later you can also change this account to a regular account and make some other account as admin account.
Note: In Office 365 migration document, it says that you should turn on the 2-step verification on the gmail side to do the migration. But, this is not required. I have completed the migration of gmail boxes to office 365 without turning on 2-step verification on gmail side. It works without any issues. You don’t have to create an app password on google side for the gmail migration. If you already have 2-step verification turned-on, and like to use it, it is Ok. But, you don’t have to turn it on, just to complete the migration, as it is not required.
For the migration, you can create all your mailboxes initially in office 365, and connect them to the corresponding gmail mailboxes. After this, this will be syncing the emails on an on-going basis, until you decided to make the final cut-over.
This way, you can work on migrating all your users mailbox in the background while they are still receiving and sending the emails through gmail until the last-minute when you decide to make the cut-over.
2. Verify Your Domain in Office 365
Login to Office 365 portal: http://portal.office.com
From here, click on the “Admin” tile from the home page. This will take you to the “Admin center” as shown below. This will says “Your office 365 setup is incomplete”. Click on “Go to setup” from here.
This will have the following three high-level steps inside:
- Step 1: Select domain
- Step 2: Add users
- Step 3: Setup DNS
Please note that we can always stop in-between and any step and continue later from where we left off. For example, we can complete step#1, step#2 and perform the last step later.
Inside the step1, there are multiple sub-steps.
Add a domain: The first is to “Add a domain”. Click on the radio button that says “I already own a domain”, and type in your domain name. Click on next.
Verify domain: Now you have to verify to microsoft that you really own this domain name. To do this, you have two options. This will automatically figure-out who own the domain. In this case, office 365 knows that the domain I entered is owned by go-daddy. So, I have the following two options:
- Sign-in to go-daddy: If I choose this option, this will redirect to go-daddy webpage, and I just have to sign-in using my godaddy credentials. This will confirm to microsoft that I own this domain.
- Verify TXT record: If I can’t do the above option, then I can manually add the TXT value given by microsoft to my domain name. If you choose this option, this will give a TXT name, TXT value, and TTL. Enter this on your domain record. Once that is done, come back here, and click on “Verify”. The following is an example TXT record given by microsoft. I just have to enter this on my domain.
TXT name: @
TXT value: MS=ms1234567
TTL: 3600
At this stage, come out of this wizard, and we’ll bulk upload the users from a different menu option.
3. Create User Mailboxes and assign Office 365 License
Before you create users, make sure you have purchased the appropriate license for these users. For example, if you are creating 10 users, first get the license for the 10 users. You can also create the users and assign the license later. But, if you are doing bulk upload, it is better to assign the license at this stage, as it is easier.
To purchase the license, from the “Admin center”, click on “Billing” on the right panel -> Click on “Subscription” -> From here, click on “Add/remove license” -> then select the total number of license you want to purchase. Please note that, you also have the option to purchase month-to-month license (instead of annual commitment).
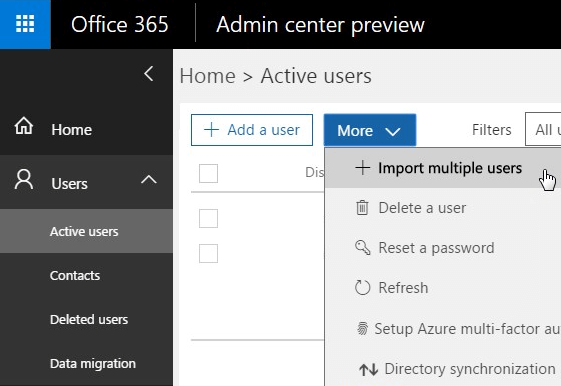
From the “Admin center”, click on “Users” on the right panel -> Click on “Active Users” -> From here, click on the “More” button, which will give you “Import Multiple Users” option.
Note: If you just have only few users and like to create them one-by-one, just click on “Add a user” from the above screen and enter the values manually.
Create an excel file (it’s really a CSV file) the first line should have the following columns exactly in the same order. This is the header row: 1) User Name 2) First Name 3) Last Name 4) Display Name 5) Job Title 6) Department 7) Office Number 8) Office Phone 9) Mobile Phone 10) Fax 11) Address 12) City 13) State or Province 14) ZIP or Postal Code 15) Country or Region
From the 2nd line onward enter the user details in each and every line. For example, if you want to create 10 users in the office 365, this excel file will have 11 lines. The 1st line is the above header line, and the next 10 lines will be for the users.
Note: The “User Name” column will contain the email address. For example, this will be ramesh@example.com
Note: When you click on “Import Multiple Users”, it will give you an option to download a sample excel sheet, which you can use as a baseline to add your users.
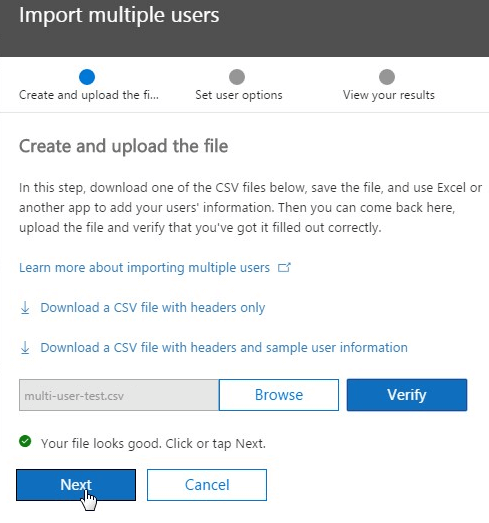
Once you have the excel with the list of usernames, from the following “Create and upload file” screen, click on “Browse”, and select the excel file. After this click on “Verify”, which will tell you whether the format in the excel file is correct or not. Once the verification is done, it will say “File looks good”. Click on “Next”.
Now, for these users, you have to set the options. For example, you’ll have to assign the product license for these users from this page. You can also not assign a license to the user by selecting the “Create users without product license” as shown below. If you choose this, you’ll have to assign the license later manually. Click on “Next”, which will create these users and display the results.
4. Create Migration Endpoints with Gmail IMAP
Now that we have created the users in office 365, next step is to create “Migration Endpoints” in 365, which will connect to gmail and migrate the emails from gmail to 365.
From the “Admin center” -> Click on “Admin centers” link at the bottom of the left panel -> Click on “Exchange” from here as shown below. This will take you to the exchange admin center.
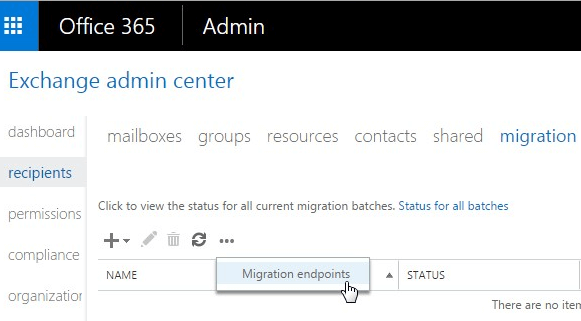
From the “Exchange admin center” -> click on “recipients” from the left panel as shown below.
From here, click on the “migration” link located on the top bar (the last option here) as shown below.
From here, click on the “…” the last option, which will show “migration endpoints” as shown below. From here, you can create the migration endpoints.
In the migration endpoints screen, click on the “+” icon to create new migration endpoints.
This will give the following three choices. Select “IMAP” from here.
- Exchange Remote
- Outlook Anywhere
- IMAP (select this)
Enter the following values for gmail migration.
- IMAP server: imap.gmail.com
- Authentication: Basic
- Encryption: SSL
- Port: 993
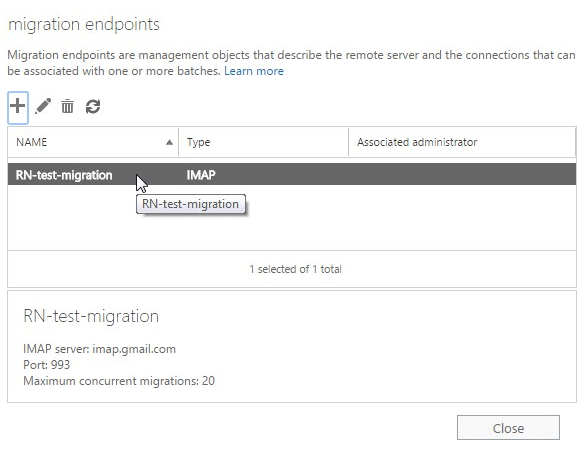
Click on “Next”, and enter a name for this “Migration endpoint”. In this example, I named it as RN-test-migration.
Leave these two fields empty. Don’t enter any values for these: 1) Maximum concurrent migrations 2) Maximum concurrent incremental sync.
Once you’ve created a migration endpoint, it will look like the following:
5. Create List of Users for Migration Batch
Next, we have to create a list of users to migrate in an excel file (it’s really a CSV file). Please note that this excel is different than the one we used for creating new users in Office 365.
This excel will be used only for migrating mailboxes from gmail to office 365 for the users that we’ve already created in office 365.
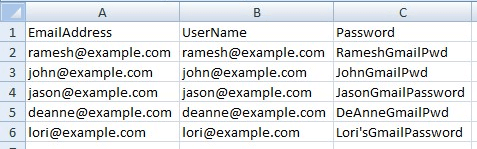
The 1st line of this excel file will be a header line with the following three values:
- EmailAddress
- UserName
- Password
Starting from the 2nd line, enter the list of mailboxes that needs to be migrated.
Note: The password field should have gmail password for the corresponding mailbox that we are migrating. The following is an example file:
6. Create Migration Batch to Migrate Mailboxes
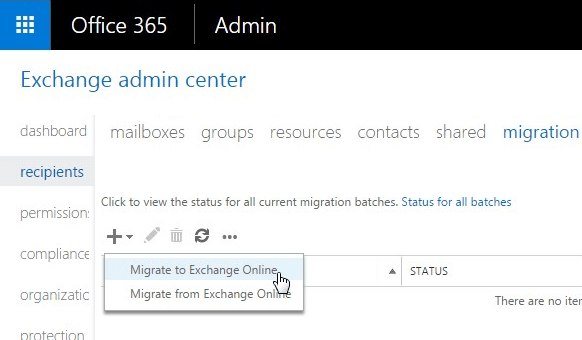
From “Exchange Admin Center” -> Recipients -> Migration -> Click on the first “+” icon, and click on “Migrate to Exchange Online” as shown below.
From here, you can create a new “Migration Batch”. This will display the following 4 options. Select the “IMAP Migration” from here.
- Remote move migration (Supported by Exchange server 2010 and later versions)
- Staged migration (supported by Exchange Server 2003 and 2007 only)
- Cutover migration (Supported by Exchange server 2003 and later versions)
- IMAP migration (supported by Exchange and other email systems) — Select This!
Next, in the “Select the Users” screen, click on “browse” and select the CVS file that we created in the previous steps with the username and password for gmail account that we like to migrate. Click on “Next”.
This will display the IMAP migration configuration. This will display the IMAP configuration values that we already entered. This should display the following: 1) IMAP server: imap.gmail.com 2) Authentication: Basic 3) Encryption: SSL 4) Port: 993
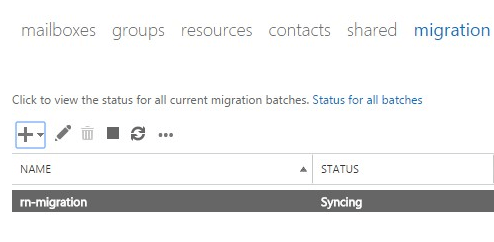
Click on “Next” and enter the Migration Batch name. In this example, I entered “rn-migration” as the name for this migration batch. Click on “New”, which will create this migration batch and start migrating the email automatically. You’ll see the status of this migration batch as shown below. Initially the status will be “Queued”, and will change to “Syncing” as shown below. Once it is done, it will says “Synced”.
While the emails are getting migrated, click on “View details”, which will display how many email have been migrated so far for each and every mailboxes.
7. Update DNS – Repoint MX Records to Microsoft
You are at the last stage. So far you’ve created all the mailboxes on the Office 365, and migrated all mailboxes from gmail to office 365. Now it is time to point your MX record in DNS from gmail to office 365.
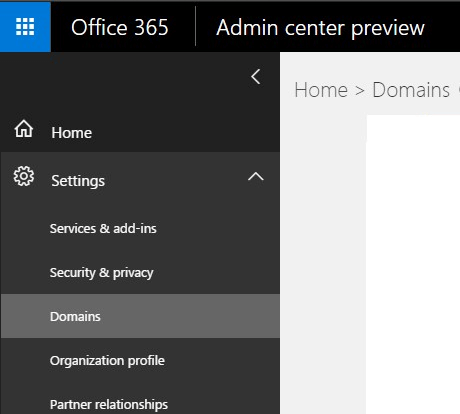
To do this, from the “Admin Center” -> click on “Settings” on the left panel -> Click on “Domains” as shown below. Click on your domain name. This will says “Setup in progress”. You might also see another line here, which will says “Setup completed”. For example, if you domain name is example.com
- example.com (Default) – Setup in progress
- example.onmicrosoft.com – Setup completed
Click on the default example.com, this will display “Setup your online services” screen with the following two options:
- Add records for me – This option will connect to your DNS domain (For example, godaddy) and update the MX records automatically.
- I’ll manage my own DNS records – This option will give you a list of DNS entries (MX record values) that you’ll need to add it manually from your domain registrar.
Click on the 2nd option, to see what MX records you should be adding on your DNS. In this example, it shows the following three records: MX, TXT and CNAME. Please note that for your domain, the MX record value will be different.
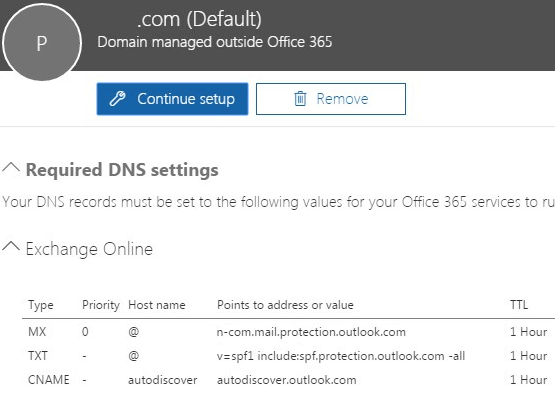
Once you update your DNS with the above values, you’l start receiving the new emails to our Office 365.


 My name is Ramesh Natarajan. I will be posting instruction guides, how-to, troubleshooting tips and tricks on Linux, database, hardware, security and web. My focus is to write articles that will either teach you or help you resolve a problem. Read more about