
![]() Gulp.js is a Node.js based build and task automation tool.
Gulp.js is a Node.js based build and task automation tool.
This is similar to Grunt.js: Intro to Grunt with Install, Configure and Build Javascript Projects
Gulp.js has been adopted by developers because of its stream based approach of getting the tasks done rather than the configuration based approach followed by Grunt.js.
Stream based approach made developers to write less lines of code because of its pipelining feature which makes it faster.
In this tutorial, we’ll explain how we can use gulp for automating a task in any Front End development project.
Gulp.js can be installed on all OS: Various linux distros including CentOS, Ubuntu, Redhat, Debian, etc, Windows, MacOS.
Gulp Introduction
We can automate and do various tasks using gulp. The following are few examples of what Gulp can do.
- Minifying the css, js and images.
- Automating pre-processor tasks like SASS and LESS.
- Automated browser re-loading on changes to file.
- Linting your js, css and html to ensure the standards.
- Setting up a local web server.
The following high-level steps are explained in detailed in this tutorial, which will help you to get started on Gulp:
- Install Node.js on Linux
- Install gulp using node package manager (npm).
- Install the required gulp plugins using npm.
- Create gulpfile.js to import plugins and create tasks.
- Run the task using terminal/Git-Bash/command line.
Install Gulp
Open your terminal/command line and install gulp using the following command. Here we are installing gulp globally so that we can run it from anywhere on the system.
npm install gulp –g

(or)

sudo npm install gulp –g
Create package.json using npm init
For adding gulp and required plugin modules from the npm repository as dev dependencies to the project, we will have to create “package.json” file.
We are keeping it as dev dependency because the plug-in which we a going to use is required on developer system only for development purpose. In other words, it is not going to be deployed on production server.
Here, “package.json” file tells npm what to be installed, when “npm install” command is run, by keeping in this directory.
This file keeps these dependencies listed in it which can be ported to other location/system/server and just by giving one command “npm install” you will get all the required packages listed in it installed and ready to be used.
You can use npm to create this file just by typing the following command while inside your project folder.
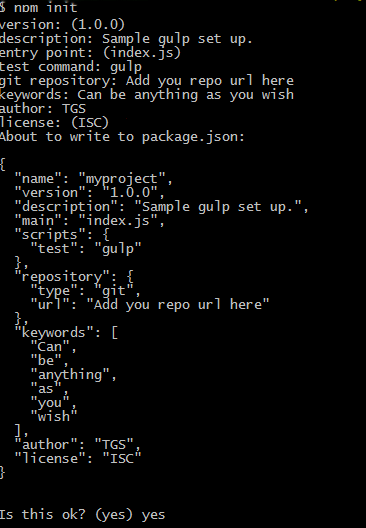
npm init
Refer the screenshot below for the npm init prompt and log messages.
Install Gulp with Dev Dependency and Gulp Webserver
Install the gulp as dev dependency to this by running following command:
npm install --save-dev gulp
Now, let’s say we want to setup a web server with auto/live reload with it. For this we have a gulp add on “gulp-webserver”. Just give following command to install it as well.
npm install --save-dev gulp-webserver
Updated package.json with Gulp
After running the above command, you will see that your “package.json” file will be updated with the “gulp” and “gulp-webserver” as the development dependency. It will look somehow as follows:
{
  "name": "myproject",
  "version": "1.0.0",
  "description": "Sample gulp set up.",
  "main": "index.js",
  "scripts": {
    "test": "gulp"
  },
  "repository": {
    "type": "git",
    "url": "Add you repo url here"
  },
  "keywords": [
    "Can",
    "be",
    "anything",
    "as",
    "you",
    "wish"
  ],
  "author": "TGS",
  "license": "ISC",
  "devDependencies": {
    "gulp": "^3.9.1",
    "gulp-webserver": "^0.9.1"
  }
}
Create gulpfile.js
Let us now create “gulpfile.js” file to import the above installed plugins and create the tasks which we need. Just add the following lines to it.
var gulp = require('gulp');
var webserver = require('gulp-webserver');

gulp.task('serve', function() {
  gulp.src('app')
    .pipe(webserver({
      livereload: true,
      directoryListing: false,
      open: true
    }));
});
Here, first two lines are where we are importing the required plugins, in the node.js way of doing it using “require”. In the next lines, we are setting up a webserver by the keyword “serve” to be used as command for starting it.
On line no 6, you can see “.pipe” statement and as mentioned earlier this creates a stream to complete one task after other. After, this we have webserver being called with its parameters as we need. Here we have kept live reloading enabled, directory listing on browser disabled and auto open of the path on a browser while giving the command on terminal enabled.
Here you can note that on line no 5 we have kept “app” folder as the web root or path from where the webserver will serve the file to the browser.
Launch Gulp WebServer
Just create a sample index.html file in “app” folder and type the following command on terminal while keeping in the project directory.
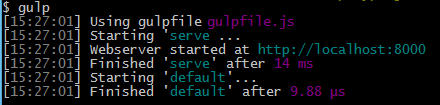
gulp serve
You will get following logs on the terminal as seen in the screenshot below and since we have kept the “open: true”, it will trigger your default browser instance serving the file in the “app” folder.

You can access the Gulp Webserver at the default port http://localhost:8080
In the above command “serve” is the keyword which we have registered while creating the task as mentioned earlier. You can also, add the following line to the “gulpfile.js” to make “serve” task as the default task.
gulp.task('default', ['serve'], function() { });
Now, you will have to just type “gulp” in the command line to start the default task, which is nothing but the webserver with live reloading, currently. Refer the screenshot below.


 My name is Ramesh Natarajan. I will be posting instruction guides, how-to, troubleshooting tips and tricks on Linux, database, hardware, security and web. My focus is to write articles that will either teach you or help you resolve a problem. Read more about