
Jenkins is an open source DevOps tool that will help you to deploy and automate your enterprise application.
In Jenkins, by default you can create users, but not groups.
So, if you want groups in Jenkins, you have the following few options:
- Use OpenLDAP with Jenkins
- Use Active Directory with Jenkins
- Use Unix user/group database. This will use PAM library to integrate with Jenkins.
- Use “Role-based authorization strategy” plugin for Jenkins
The default behavior (i.e Can’t create group) is because it uses Jenkins user database for the security realm.
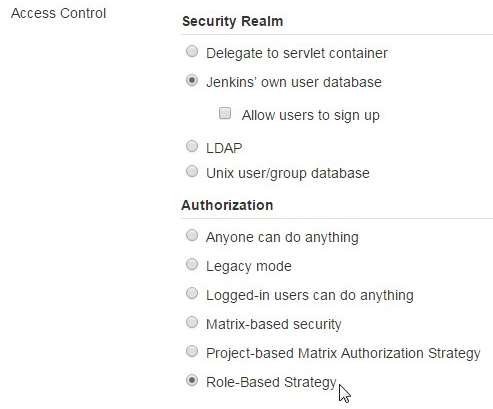
To verify this, login to Jenkins as admin, go to “Manage Jenkins”, click on “Configure Global Security”, and under the “Access Control” section, for the “Security Realm”, if you’ve selected “Jenkins’ own user database”, then you can only create users, and not groups.
If you want the ability to create groups (roles) and assign certain privileges to certain roles, and if you are not sure which option to choose, then probably using Jenkins role-based plugin is the best choice.
The role-based authorization strategy plugin works very well with the default Jenkins own user database, and the matrix authorization strategy for projects.
If you are using project based matrix authorization strategy, you can restrict user and group access on a job by job basis. i.e Each and every project will have its own restrictions.
We discussed about this in detail earlier: How to Setup User Security on Jenkins with Project Matrix Authorization
In this tutorial, we’ll focus on how to setup role based restrictions for Jenkins Jobs.
Install Role-based Authorization Strategy Plugin
Login to Jenkins with your admin account -> Click on “Manage Jenkins” -> Click on “Manage Plugins” -> Click on “Available” tab -> Search for “role” in the Filter text box.
You’ll see “Role-based Authorization Strategy” in the results. Click on the “check-box” in front of it to select this item. Click on “Install without restart” button at the bottom.
Restart the Jenkins after this plugin is installed.
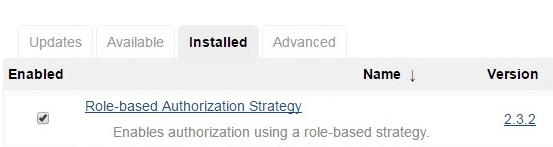
Once the plugin is installed, you should see it under “Installed” tab as shown below.
Change Jenkins Authorization Method
Once the plugin is installed, next step is to change the default Jenkins authorization method to use this role-based plugin.
For this, go to “Manage Jenkins”, click on “Configure Global Security”, under the “Access Control” section, for the “Authorization”, click on “Role-Based Strategy” as shown below.
Manage and Assign Roles Options
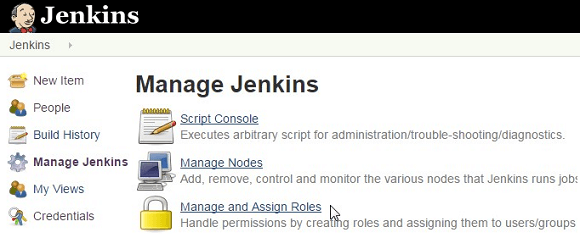
Now, if you go to “Manage Jenkins”, you’ll see “Manage and Assign Roles” as shown below.
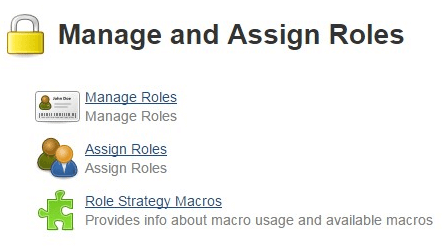
When you click on “Manage and Assign Roles”, you’ll have the following three choices:
Create a New Global Role
Click on “Manage Roles”. From here you can create global roles that will be applicable for all the objects in the jenkins. For example, you can create “admin” roles, “developer” roles, “devops” role, etc here.
To add a global role, enter the name (for example: developer), and click on “Add” as shown below.
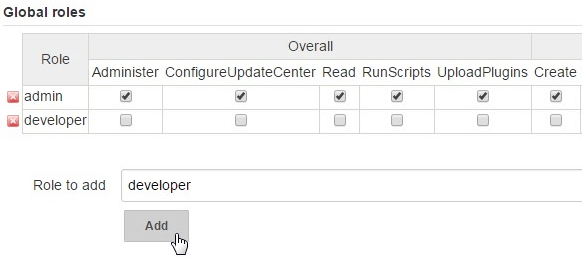
Once you add a global role (for example: developer), then select the permissions that you want to assign for that particular global role.
The following are the permissions available to be assigned to your new global role.
- Overall – Administer, ConfigureUpdateCenter, Read, RunScripts, UploadPlugins
- Credentials – Create, Delete, ManageDomains, Update, View
- Agent – Build, Configure, Connect, Create, Delete, Disconnect, Provision
- Job – Build, Cancel, Configure, Create, Delete, Discover, Move, Read, Workspace
- Run – Delete, Replay, Update
- View – Configure, Create, Delete, Read
- SCM – Tag
Note: Don’t forget to click on the “Save” button at the bottom of this page to save your changes.
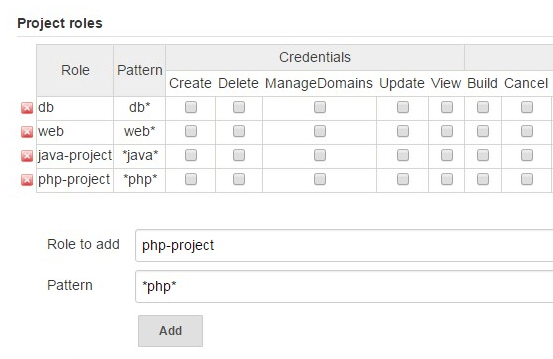
Create a New Project Role
Here, you can create roles that can be applied to only certain projects (i.e jobs) that match a certain pattern. For example, you can create a project role called “web”, which will apply only to all the projects (i.e jenkins jobs) that starts with the keyword “web*” (this is the pattern) as shown below.
The following are few things to keep in mind about the project role pattern field:
- You’ll enter a regular expression in this field. For example, web* will match all the Jenkins jobs that starts with “web”.
- By default, this value is case sensitive
- If you want case-insensitive, add “(?i)” to the pattern. For example (?i)web* will match jobs starting with both “web” and “Web”.
Once you’ve added a project role (for example: db, or web, or php-project), then select the permissions that you want to assign for that particular project role.
The following are the permissions available to be assigned to your new project role.
- Credentials – Create, Delete, ManageDomains, Update, View
- Job – Build, Cancel, Configure, Create, Delete, Discover, Move, Read, Workspace
- Run – Delete, Replay, Update
- SCM – Tag
Note: Don’t forget to click on the “Save” button at the bottom of this page to save your changes.
Also, in the Slave Roles section, you’ll create slave roles, which will give the ability for you to assign node-related permissions. In most situations, you won’t be using this.
Assign Users to the new Group (Role)
After creating the roles (either global role, or project role) with appropriate permissions, the next step is to assign users to this role.
For this, go to “Manage Jenkins” -> “Manage and Assign Roles” -> Click on “Assign Roles”.
Under the “Project Roles” section, you’ll see all the project roles that we created from the previous section. These roles will be listed as columns.
Now, to assign an user to any one of these project roles, first enter the name of the user in the “User/group to add” textbox (for example: lisa), and click on “add” button. Please note that this user should already be created in the Jenkins.
This will add the user as a “row” in this section. Now, click on the “check-box” corresponding to the project-role name for user “lisa”, which will assign that particular role to user “lisa”.
In the following example, I’ve added “java-project” and “php-project” Project roles to user lisa.
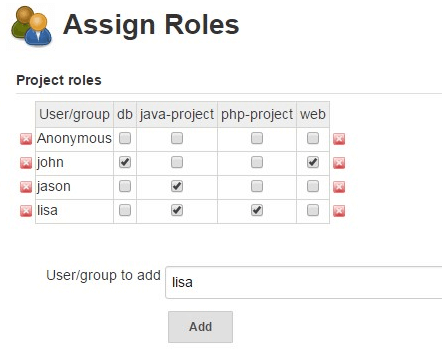
After this, lisa will have permissions to only those Jenkins projects that matches the pattern defined by the “java-project” and “php-project” that we added in the previous steps.
For example, for the “java-project”, the pattern we gave was “*java*”. So, lisa will have access to any Jenkins project that has the word “java” in the name.
Even within those matched projects, lisa can only perform certain activities based on the permissions that we assigned for that particular project role.
In the same way, from this screen, you can also assign a user to a particular global role. For example, assign lisa to “developer” global role.


 My name is Ramesh Natarajan. I will be posting instruction guides, how-to, troubleshooting tips and tricks on Linux, database, hardware, security and web. My focus is to write articles that will either teach you or help you resolve a problem. Read more about
Comments on this entry are closed.
Hello!
Thanks for article.
But, when i try to use wildcard pattern *sometext* to assign Project Role, i get error
“java.util.regex.PatternSyntaxException: Dangling meta character ‘*’ near index 0”.
Please tell me how did you manage to use the mask *php* in your example.
@Max
also had the same question 😛
Hi,
I would like “authenticated” users to have read-level access to all jobs. The plugin’s wiki talks about 2 default roles anonymous and authenticated but I do not see anonymous under any default roles. Anyway to enable/set it up ?
Thanks,
Rohit
Sorry, I meant to say I I do not see “authenticated” under any default roles.
Hello,
May i know how can i restrict access to the build button for QA role people.
Example: There is a parameter called “project_env” that will be popped up when we click on “build with parameters”, It is a dropdown and has 3 options dev, qa, prod. So wanted to know if there is a way to disable ‘Build’ button if people having QA role tries to choose prod as a project_env .
Thanks,
Ram.