
While working with PaloAlto firewall, sometimes you’ll find it easier to use CLI instead of console.
Working on CLI is very helpful when you are testing something on a dev/test firewall, where you repeatedly try-out the same thing with different values, and don’t want to do multiple clicks from the UI and retype everything.
In this tutorial, we’ll explain how to create and manage PaloAlto security and NAT rules from CLI. The following examples are explained:
- View Current Security Policies
- View only Security Policy Names
- Create a New Security Policy Rule – Method 1
- Create a New Security Policy Rule – Method 2
- Move Security Rule to a Specific Location
- Commit and Review Security Rule Changes
- Delete an Existing Security Rule
- View Current NAT Policies
- Create a New NAT Rule Policy
- Move NAT Rule to a Specific Location
- Commit and Verify NAT Rule Changes
- Delete an Existing NAT Rule
- View Both Security and NAT Rules Together
- Set Output Format – Inside Configure
- Set Output Format – Outside Configure
1. View Current Security Policies
First, login to PaloAlto from CLI as shown below using ssh.
$ ssh admin@192.168.101.200
admin@PA-FW>
To view the current security policy execute show running security-policy as shown below.
admin@PA-FW> show running security-policy

"AllowMgmt; index: 1" {
        from Untrust;
        source any;
        source-region none;
        to Trust;
        destination any;
        destination-region none;
        user any;
        category any;
        application/service [0:ssh/tcp/any/22 1:ping/icmp/any/any ];
        action allow;
        icmp-unreachable: no
        terminal yes;
}

"AllowWebAccess; index: 2" {
        from Untrust;
        source any;
        source-region none;
        to Trust;
        destination any;
        destination-region none;
        user any;
...
...
The output of the above command will be in JSON format.
2. View only Security Policy Names
If you have many security rules and like to view only the security rule name and not the details of it, then use the match command to get just the 1st line of the JSON output that has the keyword “index” in it as shown below.
admin@PA-FW> show running security-policy | match index
"AllowMgmt; index: 1" {
"AllowWebAccess; index: 2" {
"WebServerToExternal; index: 3" {
"intrazone-default; index: 4" {
"vsys1+interzone-default; index: 5" {
As shown above, in this sytem, there are currently 5 security rules.
3. Create a New Security Policy Rule – Method 1
To create new security rule, use set rulebase command as shown below.
First, enter the configuration mode as shown below.
admin@PA-FW> configure
Entering configuration mode
[edit]
From the configuration mode, create the security rule as shown below. This will create a security rule called TheGeekStuffInternal.
set rulebase security rules TheGeekStuffInternal from Untrust to Trust source any destination any application any service any action allow
At this stage, if you do show running security-policy, you’ll not see the above newly created security rule, as it’s not yet committed. But, if you login to the console, you’ll see this new rule.
4. Create a New Security Policy Rule – Method 2
Instead of specify all the values of security rule in one line, you can also specify in multiple lines as shown below.
The following will create a new security rule called TheGeekStuffExternal with the following configuration values.
set rulebase security rules TheGeekStuffExternal to Trust
set rulebase security rules TheGeekStuffExternal from Untrust
set rulebase security rules TheGeekStuffExternal source any
set rulebase security rules TheGeekStuffExternal destination any
set rulebase security rules TheGeekStuffExternal source-user any
set rulebase security rules TheGeekStuffExternal category any
set rulebase security rules TheGeekStuffExternal application any
set rulebase security rules TheGeekStuffExternal service any
set rulebase security rules TheGeekStuffExternal hip-profiles any
set rulebase security rules TheGeekStuffExternal action allow
set rulebase security rules TheGeekStuffExternal log-start yes
In this tutorial, so far we’ve created two security rules. After this, if you login to the PaloAlto console, you’ll see both of these rules as shown below.
5. Move Security Rule to a Specific Location
The following will move TheGeekStuffInternal rule to the top of the list. This rule will be executed first.
move rulebase security rules TheGeekStuffInternal top
Instead of top or bottom, you can also move a rule before or after an existing rule as shown below.
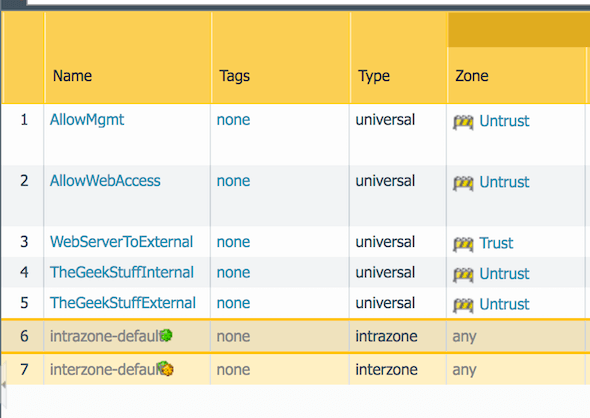
The following will move the TheGeekStuffExternal before the already existing AllowWebAccess rule.
move rulebase security rules TheGeekStuffExternal before AllowWebAccess
After the above two commands, the security rules will be re-arranged as shown below.
![[PaloAlto Security Rules Moved]](https://static.thegeekstuff.com/wp-content/uploads/2019/05/paloalto-new-secuity-rules-moved.png)
Valid actions are: top, bottom, before or after.
6. Commit and Review Security Rule Changes
Once you’ve created/modified rules, type commit as shown below to commit the changes.
admin@PA-FW# commit
Commit job 5 is in progress. Use Ctrl+C to return to command prompt
...55%70%98%.......100%
After a successful commit, you’ll see the new rules as shown below.
admin@PA-FW> show running security-policy | match index

"TheGeekStuffInternal; index: 1" {
"AllowMgmt; index: 2" {
"TheGeekStuffExternal; index: 3" {
"AllowWebAccess; index: 4" {
"WebServerToExternal; index: 5" {
"intrazone-default; index: 6" {
"vsys1+interzone-default; index: 7" {
If there is something wrong in the new security rule, you may get validation error as shown below:
Validation Error:
 rulebase -> security -> rules -> TheGeekStuffInternal  is missing 'source'
 rulebase -> security -> rules is invalid
If the new rule that you created is similar to an existing rule, you’ll get the following shadows rule warning message.
vsys1
   Security Policy:
   - Rule 'TheGeekStuffInternal' shadows rule 'AllowMgmt'
   - Rule 'TheGeekStuffExternal' shadows rule 'AllowWebAccess'
(Module: device)
7. Delete an Existing Security Rule
Execute the following command to delete an existing security rule
delete rulebase security rules TheGeekStuffExternal
8. View Current NAT Policies
The following will display all the existing NAT security rules in json format.
admin@PA-FW> show running nat-policy

"NAT2WebServer; index: 1" {
        nat-type ipv4;
        from Untrust;
        source any;
        to Untrust;
        to-interface  ;
        destination 192.168.0.10;
        service 0:any/any/any;
        translate-to "dst: 192.168.5.50";
        terminal no;
}

"NAT2External; index: 2" {
        nat-type ipv4;
        from Trust;
        source any;
        to Untrust;
        to-interface  ;
        destination any;
        service 0:any/any/any;
        translate-to "src: 192.168.0.10 (dynamic-ip-and-port) (pool idx: 1)";
        terminal no;
}
9. Create a New NAT Rule Policy
The following will create new NAT rule called TheGeekStuffNAT
configure
set rulebase nat rules TheGeekStuffNAT source-translation dynamic-ip-and-port interface-address interface ethernet1/2
You can edit an existing NAT rule, or add additional information to the above newly created NAT rule as shown below.
set rulebase nat rules TheGeekStuffNAT dynamic-destination-translation translated-address 192.168.6.40
set rulebase nat rules TheGeekStuffNAT dynamic-destination-translation translated-port 80
set rulebase nat rules TheGeekStuffNAT to Untrust
set rulebase nat rules TheGeekStuffNAT from Untrust
set rulebase nat rules TheGeekStuffNAT source any
set rulebase nat rules TheGeekStuffNAT destination 192.168.6.40
set rulebase nat rules TheGeekStuffNAT service any
set rulebase nat rules TheGeekStuffNAT to-interface any
![[PaloAlto NAT Rules]](https://static.thegeekstuff.com/wp-content/uploads/2019/05/paloalto-new-nat-rules.png)
10. Move NAT Rule to a Specific Location
The following will move TheGeekStuffNAT to the top of the list.
move rulebase nat rules TheGeekStuffNAT top
The following will move TheGeekStuffNAT after the existing NAT2WebServer rule.
move rulebase nat rules TheGeekStuffNAT after NAT2WebServer
Valid actions are: top, bottom, before, after
11. Commit and Verify NAT Rule Changes
Once you’ve created new NAT rules, commit the changes as shown below.
admin@PA-FW# commit
Commit job 8 is in progress. Use Ctrl+C to return to command prompt
...55%70%98%.......100%
Configuration committed successfully
Verify to make sure the new NAT rule is created successfully as shown below.
admin@PA-FW> show running nat-policy | match index
"NAT2WebServer; index: 1" {
"NAT2External; index: 2" {
"TheGeekStuffNAT; index: 3" {
12. Delete an Existing NAT Rule
Execute the following command to delete an existing NAT rule
delete rulebase nat rules TheGeekStuffNAT
13. View Both Security and NAT Rules Together
You can also view both the security and NAT rules together using show command as shown below.
admin@PA-FW> configure
Entering configuration mode
[edit]

admin@PA-FW# edit rulebase security
[edit rulebase security]

admin@PA-FW# show
security {
  rules {
    AllowMgmt {
      to Trust;
      from Untrust;
      source any;
      destination any;
      source-user any;
      category any;
      application [ ping ssh];
      service application-default;
      hip-profiles any;
      action allow;
    }
..
..
If you want show command to display just the NAT rules, first go into the NAT edit mode as shown below, and then do a show.
admin@PA-FW# edit rulebase nat
[edit rulebase nat]

admin@PA-FW#
[edit rulebase nat]

admin@PA-FW# show
nat {
  rules {
    NAT2WebServer {
      destination-translation {
        translated-address 192.168.5.50;
      }
      to Untrust;
      from Untrust;
      source any;
      destination 192.168.0.10;
      service any;
    }
...
...
Just like the above, you can also do it for security rules by doing “edit rulebase security” followed by “show”
14. Set Output Format – Inside Configure
As you saw from the previous example, by default show will display the output in JSON format.
You can change this behavior to display the output in set format as shown below. This is very helpful, when you just want to copy the output and change a particular value and then paste it back in the CLI.
To change the output format, useset cli command and change the value of config-output-format to set as shown below.
admin@PA-FW# run set cli config-output-format set
[edit rulebase nat]
Once you do the above, show will start displaying the output in set format (instead of the default JSON format).
admin@PA-FW# show
set rulebase nat rules NAT2WebServer destination-translation translated-address 192.168.5.50
set rulebase nat rules NAT2WebServer to Untrust
set rulebase nat rules NAT2WebServer from Untrust
set rulebase nat rules NAT2WebServer source any
set rulebase nat rules NAT2WebServer destination 192.168.0.10
set rulebase nat rules NAT2WebServer service any
set rulebase nat rules NAT2External source-translation dynamic-ip-and-port translated-address 192.168.0.10
set rulebase nat rules NAT2External to Untrust
set rulebase nat rules NAT2External from Trust
set rulebase nat rules NAT2External source any
set rulebase nat rules NAT2External destination any
set rulebase nat rules NAT2External service any
Note: In the above, the run command is executed after we did the configure command.
The following are the possible options for set command.
run set cli config-output-format default
run set cli config-output-format json
run set cli config-output-format set
run set cli config-output-format xml
15. Set Output Format – Outside Configure
Note: If you are outside configure mode, don’t give run in front as shown below.
In the following, we are outside of configure option. Here, run command is not valid.
admin@PA-FW> run set cli config-output-format set
Unknown command: run
When you are outside configure, just execute the set command without run in the front as shown below.
admin@PA-FW> set cli config-output-format set
admin@PA-FW>
Now, go inside configure and then you’ll see the output in set format as shown below.
admin@PA-FW> configure
Entering configuration mode

admin@PA-FW# edit rulebase nat
[edit rulebase nat]

admin@PA-FW# show
set rulebase nat rules NAT2WebServer destination-translation translated-address 192.168.5.50
set rulebase nat rules NAT2WebServer to Untrust
...
...


 My name is Ramesh Natarajan. I will be posting instruction guides, how-to, troubleshooting tips and tricks on Linux, database, hardware, security and web. My focus is to write articles that will either teach you or help you resolve a problem. Read more about