In the previous article Install & Create Virtual Machine, we explained how to install VirtualBox and create a Guest machine in it.
This article explains how to setup network for a guest machine and installing Guest Additions in a guest machine.
Virtual Networking
Once a guest machine is installed, the first step that everyone like to do is to configure the network for that machine. VirtualBox provides a facility to add up-to 4 Network adapter (Ethernet card) to each guest machine through the GUI.
Networking Modes
The following are the different types of networking modes available to be configured for each network adapter
- Network Address Translation (NAT)
- Bridged Networking
- Internal networking
- Host-only networking
Network Address Translation
When a guest machine is set-up in this mode, then outside world will never be able to communicate with the Guest machine directly. When the guest machine send an IP packet to some remote machine, VirtualBox’s NAT Engine will receive the packet and extracts the TCP/IP segments, and change the IP address to the IP address of the HOST machine. So the outside world only see the IP address of the Host machine. When an reply is sent, then it will be received by the HOST machine and resend to the Guest Machine.
Bridged Networking
It is similar to connecting a physical machine in a network. Outside world can directly communicate with the Guest machine. When a guest is configured for Bridged Networking, then VirtualBox uses a device driver on the host system, which can intercept and inject data through the physical network adapter present in the HOST machine.
Internal networking
We can create more than one Guest machine, using VirtualBox. So if we want all the guest machine to communicate internally, then we can use this Internal Networking mode. Though we can use Bridged Networking also for this, Internal Networking is more secure.
In Bridged Networking, all the packets are sent/received from the physical network adapter in the HOST machine. If someone attaches a packet sniffer tool in the HOST, then all the communication will be captured. In case of Internal Networking, the communication between the Guest machines will be secure.
Host-Only Networking
It is a hybrid of Bridged and Internal networking. In this mode, the Guest machine can talk to each other and also with the Host machine. It will look like, all machine ( including Host and Guest Machines ), are connected to a physical network switch. The guest machine cannot communicate with the outside world too, since they are not connected via a physical interface.
So based on the need, we can actually choose between the networking modes. Now we will see how we can configure the ‘Networking’ in VirtualBox UI.
Steps to Configure Network
1) Launch ‘VirtualBox’
2) Select the ‘Guest Machine’ and click ‘Settings’.
3) Choose ‘Network’. It will have the details similar to
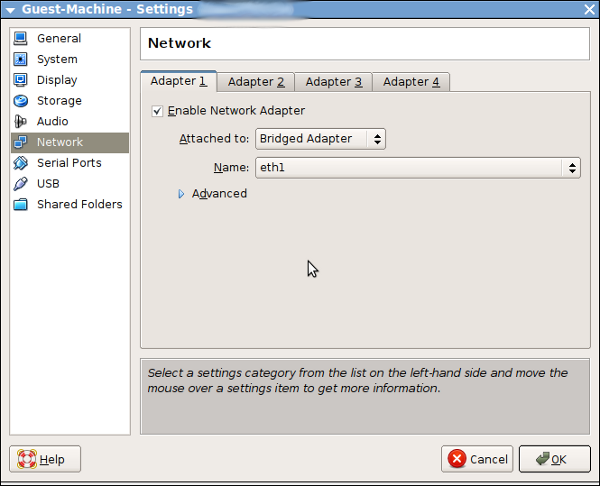
4) Check the ‘Enable Network Adapter’
5) Attached to, will have all the above mentioned mode. Choose the one you need. Here I choose ‘Bridged Adapter’
6) If your host network has more than 2 physical Ethernet card, then choose one among them, which will be used as the interface to send/receive packets by the Guest Machine
7) The advance menu, will have the Adapter type and MAC address for the virtual interface. Change it if you need.
8). Finally, you can ‘tick’ the Cable Connected check box. This is like physically connecting the network cable to a machine.
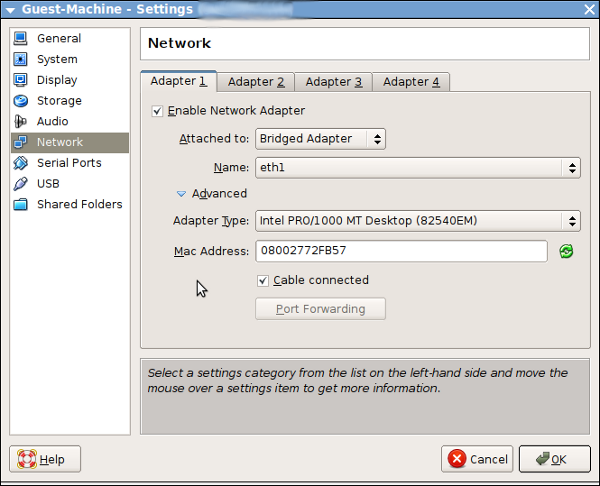
9) Click ‘OK’ and ‘Start’ the guest machine
10) Now, configure the network as usual using ifconfig or ‘network-admin’ command and restart the networking services.
11) We are done with setting up a networking for a Guest machine successfully.
Guest Additions
Guest Additions can be installed in a Virtual Machine, after installing the Operating System in it. It consists of device drivers and other applications which can optimize the performance and usability of a Virtual Machine.
The Guest Additions can provide the following features.,
- Mouse pointer integration
- Time synchronization
- Shared folders
- Seamless windows
- Shared clipboard
Guest Addition Installation
Here we will see how to install guest additions in Debian Lenny, and for all flavors mostly this will be applicable.
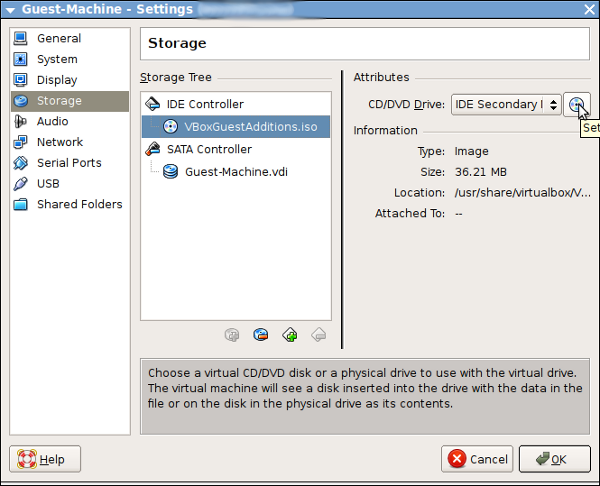
By default under /usr/share/virtualbox/, there will be a file named, VBoxGuestAdditions.iso. We need to map this iso to the Guest machine. To do that,
1) Launch ‘VirtualBox’
2) Select the ‘Guest Machine’ & click ‘Settings’
3) Select ‘Storage’
4) On the ‘Storage Tree’, under ‘IDE Controller’, select the ‘Empty’ CD as shown in the following image
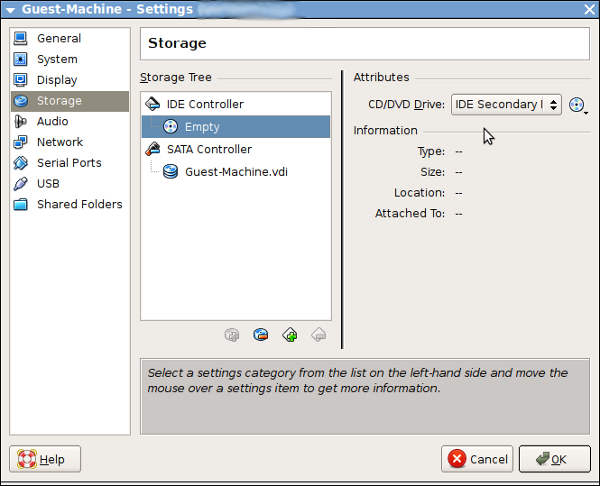
5) Now browse through the ‘/usr/share/virtualbox/’ directory, and choose the ‘VBoxGuestAdditions.iso’ file as shown below
6) Click ok
7) Start the Guest Machine
Once the Guest machine is started, you may notice some 2 mouse pointers. One for Host machine and One for Guest Machine. This often causes confusion, and we can avoid once we install the Guest Additions.
8). Login to the guest machine as ‘root’.
9) Mount the CD, with the help of ‘mount’ command.
# mount /dev/hdc /mnt
# cd /mnt
10) You will see a list of files as shown below
# ls -1
AUTORUN.INF
VBoxWindowsAdditions.exe
VBoxWindowsAdditions-x86.exe
VBoxWindowsAdditions-amd64.exe
autorun.sh
VBoxLinuxAdditions.run
VBoxSolarisAdditions.pkg
64Bit
32Bit
11) Install the following dependencies
apt-get install make gcc linux-headers-$(uname -r)
12) Execute
sh ./VBoxLinuxAdditions.run
13) Once it is installed successfully, reboot the machine.
14) Now when the machine is staring, Guest addition service will start automatically. You will notice only 1 mouse pointer now, when the mouse pointer is within the Guest machine, it operates on the guest machine, once it is moved out of the Guest machine window, it operates on the host machine.
VirtualBox also sync the time between the host and guest machine. By default, for every 10 seconds, the guest time will be reset to the host time.
You can control various timing related parameters using ‘VBoxService’ command on the guest machine.
The following illustrates the time reset by VirtualBox.
Guest-Machine:~# date -s "Tue Mar 18 11:41:43 IST 2012"
Sun Mar 18 11:41:43 IST 2012

Guest-Machine:~# date
Sun Mar 18 11:41:48 IST 2012

Guest-Machine:~# date
Sun Mar 18 11:41:53 IST 2012

Guest-Machine:~# date
Sun Mar 18 11:47:48 IST 2012
For more details with regard to Time Synchronization, please read Time Sync
Shared Clipboard
You can share the Clipboard ( A kind of buffer used for cut, copy, paste ), between the Guest machine and the host machine. It will work only if the Guest Additions is installed in the Guest machine. You can change the setting for clipboard sharing as shown in the figure.
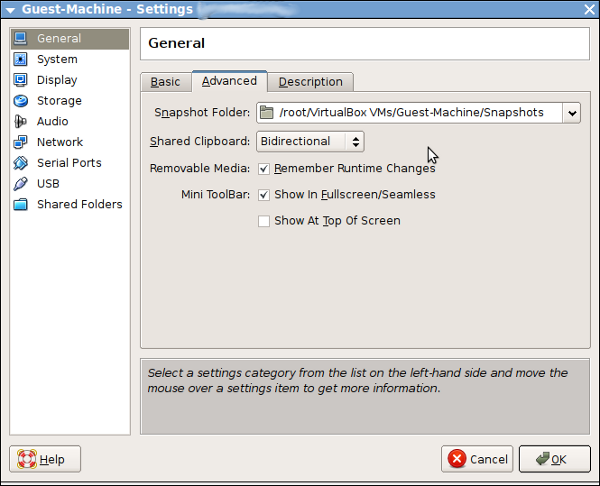
Once it is done, you can copy a document in the Guest machine, and paste the document in a file under the host machine and vice versa.
VBoxClient is the command under the Guest machine which can be used to start the VirtualBox X Window System guest services like clipboard, display, seamless windows. It will be started automatically (if guest additions are installed) when the Guest machine is booted.


 My name is Ramesh Natarajan. I will be posting instruction guides, how-to, troubleshooting tips and tricks on Linux, database, hardware, security and web. My focus is to write articles that will either teach you or help you resolve a problem. Read more about
Comments on this entry are closed.
Hi,
Thanks for nice article
Is there a step by step guide of how to install any softwares on the guest OS.My guest OS is Fedora and host OS is windows XP.
1.)Now do I connect my guest OS to the internet.The internet doesnt seem to work.I am aware I have to configure my networkinterfaces for the same but I am not exactly sure how to do it?
2.) I want gcc command to run on my guest OS?How can I do it.Rite now I am getting an error as below “bash:gcc command not found…”
Can you let me know how to do this?
Ajit
@Ajit
1)
* Ascertain whether internet is working host OS
* Follow the steps given to setup a Guest Networking ( bridged networking should work )
2)
* Running a command in guest machine is as similar as running a command in Host.
* You are getting “Command not Found” error, so it seems gcc was not installed.
* Try installing gcc command in the Guest OS
Hi,
i have Mac OSX as Host machine and Ubuntu server 2.6.32-38 machine as guest , i have selected Bridge Network in the the Adapter1 and NAT adapter in the second and other 2 i have left them blank , wt i want is i should be able to communicate(i.e ping,ssh,scp etc ) to my host machine from Guest and vise versa, as well i should be able to communicate to the outside world i mean able to connect to internet to download or install things on the Ubuntu machine, right now with the above settings am just able to communicate among the other virtual and Host machine , but the communication to outside i.e internet will not happen. please let me know what is the configuration of adapters i have to use so that i meet my above requirement .
@deepak
What is the exact routing table entries on Guest Machine. Just do a route -n and paste the result!..
below is my guest machine routing table entries
Kernel IP routing table
Destination Gateway Genmask Flags Metric Ref Use Iface
172.19.150.0 0.0.0.0 255.255.255.0 U 0 0 0 eth0
0.0.0.0 172.19.150.1 0.0.0.0 UG 100 0 0 eth0
@deepak
Try pinging 172.19.150.1 from the Guest machine. If that is accessible, then you need to check why from “GATEWAY”, the packets are not sent out.
You told, you’ve enabled “2 Adapters”. Make sure that eth0 was referring to the one which is set as “Bridged Adapter”.
ping 172.19.150.1
PING 172.19.150.1 (172.19.150.1) 56(84) bytes of data.
64 bytes from 172.19.150.1: icmp_seq=1 ttl=255 time=0.925 ms
64 bytes from 172.19.150.1: icmp_seq=2 ttl=255 time=0.877 ms
64 bytes from 172.19.150.1: icmp_seq=3 ttl=255 time=1.62 ms
64 bytes from 172.19.150.1: icmp_seq=4 ttl=255 time=1.01 ms
^C
am able to ping , and i have set eth0 to Bridge Adapter , how can i check packets are sent from the above displayed gateway or not , is there any command for that ?.
Try using Wireshark tool in the Gateway machine and find out whether the packets are sent or not
Thanks
Most updated info
Hi,
i have Windows7 64 bit as Host machine and windows7 64 bit machine as guest over oraclevmbox 4.1 ,
i have selected Bridge Network in the the Adapter1
wt i want is i should be able to communicate(i.e ping,ssh,scp etc ) to my host machine from Guest and vise versa, as well
i should be able to communicate to the outside world i mean able to connect to internet to download or install things on the Ubuntu machine,
right now with the above settings am just able to communicate among the other virtual and Host machine , but the communication to outside
i.e internet will not happen. please let me know what is the configuration of adapters i have to use so that i meet my above requirement .
Can anyone provide me the details over capacity planning Production Capacity Management (Commissioning of new hardware on demand and De-Commissioning when not required)
Hejsa!
I was trying to install guest additions.
1) Run from cd (VBoxGuestAdditions.iso). (I couldn’t insert the cd with linux not running, so I inserted it with linux running.
2) The cd began to install guest additions, but then I stopped it, because I forgot to check whether dkms was installed.
3) dkms was installed: yes.
4) Start cd again. Previous install of guest additions was detected, proceed with install / delete previous? Yes.
And now I end up here, with no idea how do proceed.
Lise
very good explanation .
I ‘ve been really stuck up trying to established a connection between
the Host OS & VirtualBox, Really Appreciate the help!! I ‘ve tried the solution that you suggested here but to no avail.
I ‘ve installed Virtualbox 4.2.10 on RHEL 6 and installed guest OS
RHEL 6 on it. I ‘ve configured NAT & Host-only adapter in order to
established the connection with the Virtualbox from the Host OS. and The Host server is connected to Internet through a modem not to any Office network as this is a Personal server.
The Host OS IP is 192.168.56.8 & its DNS is 192.168.56.1 which i ‘ve assigned through the system-config-network utility on RHEL 6. and followed the instructions for the Guest VM IP given here. i.e guest configured
NAT & Host-only adapter for the Virtualbox given here. and also checked with the ifconfig command that
the IPs assigned correctly.
The Guest Virtualbox IP: 192.168.56.100 & DNS 192.168.56.1 which i ‘ve assigned through the system-config-network utility on RHEL 6.
But still I can not ping the Host OS from the Guest OS i,e from the VirtualBox
when i ping the host OS it says that the Network unreachable.
The entries in the /etc/hosts & /etc/resolv.conf for the Host IPs and the DNS which is same as that of HOST OS is there. But it failed to establised connectivity from the Guest OS to Host OS. although i can ping the
guest OS from the Host OS.
Could you please suggest what i need to do inorder to establish connectivity from Guest OS to Host OS.
Thanks
Priya
THANK YOU! This is the only tutorial I found that actually works! You guys rock!
aaaaaaaaaaweeeeeeeeeeeeeeeeeeeesooooomeeeeeee tutorial hats off to you
Excellent Explanation! Thanks!
Virtual kubuntu installed in windows 7 using virtual box is communicating with internet using wireless as well as cable via the router.
But when I connect my host using a reliance data card the guest is not able to access the net.
Under network adapters I have set the 1st adapter to ‘Bridge’.
Please advice me whether should I change anything under adapter 1, or can I additionally use the 2nd or 3rd etc and if so by what settings?
Thank you
Very, good article helped me tremendously.