This article explains how to upgrade Big-IP F5 load balancer LTM software from version 9 to 11 (and from 10 to 11)
There is no direct upgrade path from 9 to 11. So, we have to first upgrade from 9 to 10, and then from 10 to 11. Starting version 10, upgrading F5 is fairly straight forward, as you can do it from the GUI itself (which is explained below).
While this upgrade was done on a F5-BIG-LTM-1600 device, this is pretty similar to other LTM models too.
There are the three high-level steps involved in this upgrade:
- Upgrade from 9.4.5 to 9.4.8 (There is a reason for this, which is explained below)
- Upgrade from 9.4.8 to 10
- Upgrade from 10 to 11
I. Preparation Work
1. Check the Current Version
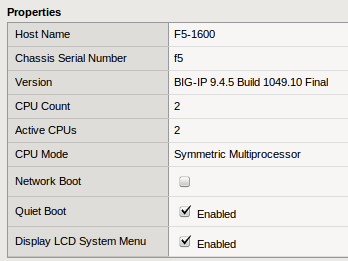
To check your current version, login to F5 admin GUI -> System -> General properties, which will display the following screen that shows the version number. As you see below, on this system, it is on version 9.4.5

2. Backup F5 Configuration
Before we upgrade, let us backup the current configuration.
Login to the F5 GUI -> System -> Archive -> Click on “Create”, which will crate a backup of the current configuration. Click on “download” link next to the backup that just got created, and downloaded it to your local system.
Also, SSH to the F5 box, and save the current configuration to config.ucs file using the “b config” command as shown below.
[root@f5] # b config save /config.ucs
Saving active configuration...

[root@f5] # ls /config.ucs
config.ucs
3. Download New F5 ISO Image
Login to the F5 download site with your f5-support username and password, and download all required ISO images.
- Click on ‘Find a Download’ -> Click on “BIG-IP v9.x” -> Click on “9.4.8” (and download the local-install version). Please note that you’ll download localinstall only for upgrading from 9.4.5 to 9.4.8 (for 10 and 11, you’ll download full install as shown below). In this example, it downloaded local-install-9.4.8.355.0.im file.
- Click on “BIG-IP v10.x / Virtual Edition” -> Select “10.1.0” from the drop-down list (If you see any latest version than this on 10.x, you can use that too). In this example, it downloaded BIGIP-10.1.0.3341.0.iso file.
- Click on “BIG-IP v11.x / Virtual Edition” -> Select “11.1.0” from the drop-down list. In this example, it downloaded BIGIP-11.1.0.1943.0.iso file.
II. Upgrade from 9.4.5 to 9.4.8
If you are on 9.4.5 and try to upgrade directly to 10, you might get “Unknown option: format” error while running image2disk command. If this happens to you, try to first upgrade from 9.4.5 to 9.4.8 (before upgrading it to 10)
[root@f5] # image2disk -instslot=HD1.2 -format=volumes BIGIP-10.1.0.3341.0.iso
Unknown option: format
Usage: /usr/sbin/image2disk [options]
4. Move 9.4.8 Image to F5 Device
Login to F5 using ssh, and create the following directory.
[root@f5] # mkdir -p /shared/images
Using SCP copy the downloaded local-install-9.4.8.355.0.im file to /shared/images directory. Do a md5sum command on this file on the device, and compare with the MD5 checksum value you got from the F5 download website for this localinstall file.
5. Upgrade F5 from 9.4.5 to 9.4.8
Use im command to execute the local-install file, which will upgrade from 9.4.5 to 9.4.8.
Remember, the reason we are doing this upgrade is because we need image2disk command to have format option (which is required during upgrade 10). This format option on image2disk command is not available in version 9.4.5 (or previous versions).
In the following upgrade, it shows that v9.4.5 is installed on HD1.1. So, you have to choose HD1.2 to install v9.4.8 (i.e the one on which the current version is not running).
[root@f5] # im local-install-9.4.8.355.0.im

Current Products Found:
HD1.1 : BIG-IP v9.4.5 1049.10 (currently running)
HD1.2 : BIG-IP v9.4.5 1049.10

Select a boot image location for installation
HD1.1  No-change
HD1.2  Install Packages: LTM, ASM, and WA v9.4.8 355.0 (/mnt/tm ...

Installation Summary
HD1.1: No-change
Current Installation: BIG-IP v9.4.5 1049.10

HD1.2: Install BIG-IP v9.4.8 355.0
Replace Installation: BIG-IP v9.4.5 1049.10
Use Configuration: From HD1.1 BIG-IP v9.4.5
Again, the key point to remember here is that, select the other HD where the currently running version is not installed. In the above example, current version is running on HD1.1. So, I have to select HD1.2 to install the new version.
II. Upgrade from 9.4.8 to 10.1.0
6. Move 10.1.0 Image to F5 Device
Using SCP copy the downloaded BIGIP-10.1.0.3341.0.iso file to /shared/images directory. Do a md5sum command on this file on the device, and compare with the MD5 checksum value you got from the F5 download website for this localinstall file.
[root@f5] # md5sum BIGIP-10.1.0.3341.0.iso
df5fdc1b8f336879b9cfb83585cd021c  BIGIP-10.1.0.3341.0.iso
7. Upgrade F5 from 9.4.8 to 10.1.0
Before starting the upgrade, SSH to the F5 box, and save the current configuration to config.ucs file using the “b config” command as shown below.
[root@f5] # b config save /config.ucs
Saving active configuration...
Starting version 10, you cannot use im command to upgrade. Instead, use image2disk command. If you try to use im command, you’ll get the following error message:
[root@f5] # im BIGIP-10.1.0.3341.0.iso
/tmp/rpmdisk.A6U3Kv /shared/images
info: system has tm_install-2-1.0.96.0
info: media has perl-RPM2 version 0.67, release 10.0.0.4598.0
info: adding bin/../isolinux/install/perl-RPM2.rpm to system...
The im utility is no longer used to upgrade software images.
Please use 'image2disk'. For help, use 'image2disk -h'.
You must always install to an image location that is not in use.

Here is your current image-location status:
Unexpected error. See log (/var/log/user.log)
warning: unkeyed eud boot entry found (End User Diagnostics); assigning st.eud
Before using image2disk to upgrade, you want to identify which HD to use for installation. Use switchboot -l command which will display which HD is currently getting used.
[root@f5] # switchboot -l
Current boot image:
    HD1.2 - BIG-IP 9.4.8 Build 355.0
Default boot image:
    HD1.2 - BIG-IP 9.4.8 Build 355.0
Available boot image(s):
    HD1.1 - BIG-IP 9.4.5 Build 1049.10
    HD1.2 - BIG-IP 9.4.8 Build 355.0
As shown above, HD1.2 is currently getting used and has version 9.4.8. So, to install 10.1.0, we can use HD1.1
Use image2disk command to execute the BIGIP-10.1.0.3341.0.iso file, which will upgrade from 9.4.8 to 10.1.0 as shown below. –instslot=HD1.1 indicates that this 10.1.0 image should be installed on HD1.1
[root@f5] images # image2disk -instslot=HD1.1 -format=volumes BIGIP-10.1.0.3341.0.iso
info: Repository tm_install version/release is 2.6.0/234.0
info: System tm_install version/release is 2.5.2/7.0
info: Updating system tm_install files from BIGIP-10.1.0.3341.0.iso
...........................................................................
6924 blocks
info: Installer on image is newer, reexec
info: Running updated installer.
warning: System has no isoinfo utility; guessing that BIGIP-10.1.0.3341.0.iso is a product image.
warning: This system has old boot configuration utilities.
warning: Services must be stopped during updates.
info: System already has perl-RPM2
info: kernel for selected product supports relocation
info: Selected product requires a minimum of 1024 MiB of ram.
info: License entitlement check; pvd = 20091124, scd = 20120302
info: Begin Install: BIG-IP 10.1.0 build 3341.0 from BIGIP-10.1.0.3341.0.iso to sda, 1
info: Updating maintenance OS.
info: No MOS currently exists. Installing 2.6.0 - 234.0
info: Updating boot partition files...
info: Rebooting to MOS...
II. Upgrade from 10.1.0 to 11.1.0
8. Upgrade F5 from 10.1.0 to 11.1.0 from UI
Before starting the upgrade, SSH to the F5 box, and save the current configuration to config.ucs file using the “b config” command as shown below.
[root@f5] # b config save /config.ucs
Saving active configuration...
Starting from version 10, you don’t need to use im (or image2disk) to install the ISO, instead you can just upgrade from the F5 GUI itself.
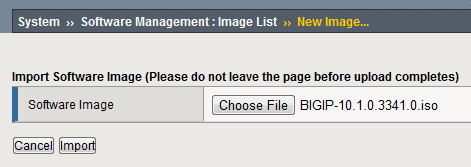
Login to F5 UI -> System -> Software Management -> Image List -> Import. Click on ‘choose file’ and select the version 11.1 image file (i.e BIGIP-11.1.0.1943.0.iso ). Click on the ‘Import’ button.

Once imported, this will show the available ISO images. Click on the check-box in front of BIGIP-11.1.0.1943.0.iso, and click on ‘Install’, which will just upgrade from version 10.1.0 to 11.1.0.
9. Verify the Upgrade
After upgrading from version 10.1.0 to 11.1.0, when you login to the F5 GUI, you might see the following error message:
The configuration has not yer loaded. If this message persists, it may indicate a configuration problem.
This might happen only if you are upgrading from pre version 10 to directly version 11. In my case, it happened, as I upgrade from version 9.4.5 to 9.4.8 to 10.1.0 to 11.1.0. So, I rolledback to version 10.1.0, made some change to the configuration, saved the configuration file from the UI, and did the upgrade again from version 10.1.0 to 11.1.0. After this, “The configuration has not yet loaded” error message was gone.
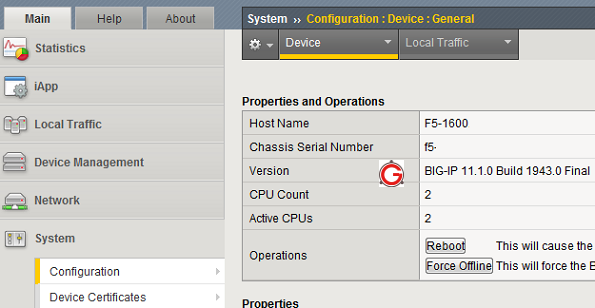
Once it is upgraded to 11.1.0, login to F5 UI, and go to System -> Configuration -> Device -> General, which should display the current F5 version. In this case it is 11.1.0


 My name is Ramesh Natarajan. I will be posting instruction guides, how-to, troubleshooting tips and tricks on Linux, database, hardware, security and web. My focus is to write articles that will either teach you or help you resolve a problem. Read more about
Comments on this entry are closed.
Are you planning on doing more on BIG IP?? 🙂
just a question – can a resource manager have console access?
Thanks for good manual.
When you said “I rolledback to version 10.1.0, made some change to the configuration, saved the configuration file from the UI, and did the upgrade again from version 10.1.0 to 11.1.0. After this, “The configuration has not yet loaded” error message was gone.”
Which kind of changes did you do?
I ask because i have same problem… 🙁
Thks in advance for your answer,
First, THANK YOU. This is a very thorough write-up, and you saved me dozens of headaches.
Update:
When upgrading from 9.4.8 to 10.2.4, it is critical to change the disk structure from “partitions” to “volumes”. The image2disk command no longer allows using both options –instslot and –format, it was an either/or situation now. Since v10 worked on either partition or volume, I decided not to reformat the disk. I left v10 running on partition.
But … Partitions caused the subsequent upgrade from 10.2.4 to 11.3.0 to fail. I believe v11 is volume-only. It could neither install on partition nor convert the existing partition to volume. Upgrade fails instantly, both via the web interface and using image2disk –format=volumes.
SOLUTION: Using image2disk, I applied the 10.2.4 iso image overtop of the existing 10.2.4 install.
image2disk –format=volumes BIGIP-10.2.4.577.0.iso
This converted disk config from partitions to volumes. Once that conversion completed, then the upgrade to 11.3.0 worked automagically via the web interface.
Pretty good.
I have one question
Can I use this step but change a bit
1. 9.1.2 >> 9.4.8
2. 9.4.8 >> 10.2.4
can I?