Screenshot is an image taken by a computer to capture the visible items on the monitor or any other output devices. There are several ways of taking screenshots in Linux. In this article, we will cover few tools that are used for taking screenshots.
1. Use Print Screen
This is the most common method to take screenshots. Pressing the “Print Screen” button will take the screenshot of the “Entire Visible Screen”.
When we want to take a particular window, we can use “Alt+Print Screen”. Alt+PrintScreen will take only the particular window which is currently active.
2. Use gnome-screenshot
gnome-screenshot utility is part of the GNOME Desktop Environment, which can also be used to take screenshot. It also has a command line mode (gnome-screenshot)
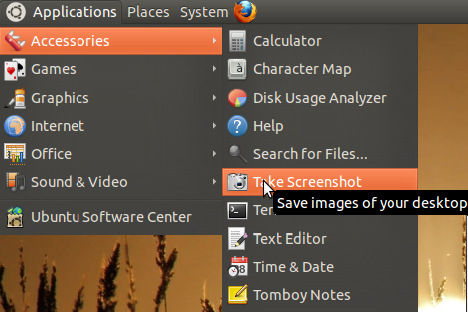
Launch the screenshot tool as shown below.


Capture the Entire Screen:
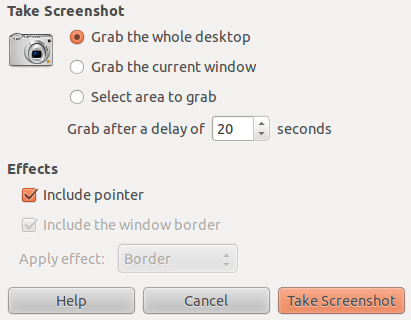
From the UI, to take a screenshot with entire screen, select “Grab the whole desktop” and click “Take Screenshot”.
From the command-line, just type the command “gnome-screenshot” to do the same. The command will take a screenshot and provide a dialog to save it.
$ gnome-screenshot
Capture Only the Current Window:
From the UI, to take the screenshot of the current active window alone, select “Grab the Current Window” and click “Take Screenshot”.
From the command-line, use the -w option as follows to do the same.
$ gnome-screenshot -w
Take Screenshot After Some Delay:
From the UI, you can also set a delay before taking the screenshots. Set the “Grab after a delay” to the required number of seconds. This will be really helpful when we need to take screen shots of navigation.
From the command-line, use -d option to do the same. -d 2 is used for delaying the screenshot for 2 seconds. So within the 2 seconds, we can make the window which we want to take screenshot as active.
$ gnome-screenshot -w -d 2
Capture a Particular Area:
From the UI, if you want to take a particular rectangle area alone, then select “Grab a Particular area” and click “Take Screenshot”.
From the command-line, use the -a option to do the same. Once this command is entered, the mouse pointer will be changed, and you can drag and select which area to take screenshot.
$ gnome-screenshot -a
Take Screenshot Including or Excluding Window Border:
From the UI, you can also include or exclude the window border by selecting/deselecting “Include the Window Border” option.
From the command line, use -b/-B options respectively to do the same. This command will include the window border along with the screenshot.
$ gnome-screenshot -w -b
The following command will exclude the window border from the screenshot.
$ gnome-screenshot -w -B
3. Use ImageMagic’s Import Command
ImageMagick is an open source software suite for displaying, converting, and editing raster image files. It comes with various command line tools, and one of that is “import”. Now we will see, how we can use import to take screenshots. You can install it by using apt-get on debian/ubuntu as follows:
# apt-get install imagemagick
Capture Entire Screen using -window root option
Use the “-window root” option to take screenshot of the complete screen. The screenshot will be saved in the file name provided in the command line.
$ import -window root Pictures/Image5.png
ImageMagick supports more that 100 file types. You can use any one of them to store the output.
Capture a Particular Window/Area:
Type the following command, it will change the mouse pointer to “Cross” symbol. Select the window which you would like to take screenshot or click and drag to take screenshot of particular area.
$ import calc.png
Include the frame using -frame option:
You can also include the “frame” of the window using the -frame option.
$ import -frame Image6.png
Take Screenshot and Resize using -resize option:
You can also take screenshot and resize the screenshot using the -resize option. Pause option is used to make a delay before taking the screenshots.
$ import -window root -resize 640 -pause 4 Pictures/Image7.png
Please refer “man import” for more number of options supported by import command.
4. Use GIMP
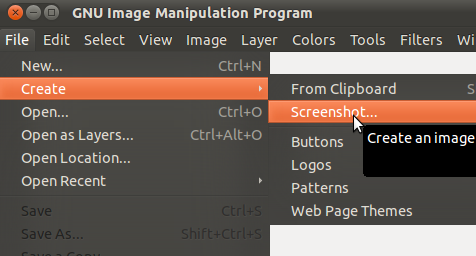
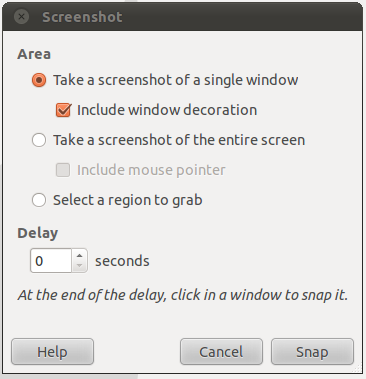
You can also take screenshot from gimp. Launch gimp, and click “File->Create->Screenshot”. A new dialog window will open with options similar to gnome-screenshot.


Did we miss any of your favorite tools to capture screenshot? Leave a comment and let us know.


 My name is Ramesh Natarajan. I will be posting instruction guides, how-to, troubleshooting tips and tricks on Linux, database, hardware, security and web. My focus is to write articles that will either teach you or help you resolve a problem. Read more about
Comments on this entry are closed.
Use compiz Screen shots its easier and simple to use.
I usually use the imagemagic for remote connection, and ksnapshot for local computers.
Thx TGS for this reminder
Shutter is also a very flexible tool for screen-captures.
Hi,
Thanks, very useful article…
I really like Shutter because it has a good number of features w/o going overboard. Basic editing is really handy too.
I just tried all the four methods. It is usefull in writing your own linux manues.
I also use shutter. It is useful because apart from clearly making the part of the screen you are capturing obvious, there are options to (a) store the images to particular directory and label them according to predefined schema, and (b) quickly augment the screen capture with annotations (arrows, circles and text). Makes collecting a sequence of screenshots without stopping your workflow, using simple keystrokes, extremely easy.
I often use gimp for taking screenshots, then I can resize, crop etc.
but imagemagick is enough when I don’t need to alter screenshot.
i use scrot assigned to hotkey
You missed probably the most feature-rich screenshot tool – Shutter.
Install with
sudo apt-get install shutter
You can take screenshots of the whole desktop, or select an area to grab, you can then after the screenshot is taken draw on it or write text on it, export to various web services or to a folder. It is similar to SnagIt.
can you plz tell me how to take screenshot and save that screenshot automatically using unix command…I know the command for taking screenshot but how to save it automatically i don’t know….plz replay me…
SHIFT+print screen allows you to grab a portion of the screen.
the PrtSc button works just great and I don’t see why anyone should waste their time with any other tool if that one works for you.
the ctrl key modifier makes it save to the buffer for pasting.
1. by it’s self it prompts to save the whole desktop
2. alt + prtsc saves the current window
3. shift + prtsc lets you select an area
those 3 options with the ctrl key modifier pretty much gives you all the options you’d ever want.
This is great thank you! I’m loving the gnome-screenshot command line method.
I’ve got a problem; The quality of the screenshots is not good.
For example; When i take a screeenshot of openoffice writer, all the letters get a blue-ish edge around them.
How can i capture exactly what’s on the screen without loss ?
Scshoot is open-source cross-platform (Java) screen capture and recording tool: http://github.com/edartuz/scshoot
Besides of single-image capture, can record part of screen to animated PNG (APNG) or video.
Hi all,
I’m quite new on linux. My computer has 2 screen connected. Do you know the command line enabling to take a screenshot of both screen at the same time?
Thanks,
William
gnome-screenshot -w -d 2: very good method to take a screenshot with a selectbox opened! Thus, open a terminal, enter gnome-screenshot -w -d 2 or more seconds, go to your window within the seconds, open the select boy and wait…
Thanks for your idea…
Many of my Ubuntu default installations have bugged, vanished or otherwise broken because it does not seem to do well with a “closed laptop connected to external monitor, keyboard, and mouse” configuration. I need to be able to take screenshots, but the only GUI desktop I can keep working correctly (not shutting down when the laptop lid is closed, as I have selected in all available power saving settings: to ignore the lid closing when on AC power) is XFCE. But the printscreen button does not seem to work at all anymore and the only option I’ve managed to get working is to use “Take Screenshot” via an icon I placed in my panel top bar. This not only makes it nearly impossible to capture screenshots quick enough just from having to move the mouse and click the icon, but also it does not allow me to set the delay to 0.
Does anybody have any suggestions as to how I can restore functionality of my printscreen button to take screenshots instantly, without any delay, or what packages may need to be removed and reinstalled to fix the original system default functionality?
Easy tutorial with actual screenshots of how to take a screenshot. Thank you!
Very excited to find your perfect instructions, thanks!
One major problem I’m having though; my bitmap image is being cropped by blender (or also, i’ve had it repeat my design to fill some pre-defined format). Have played with the import dialog and searched the control panels for a way to get MY bitmap to be THE final image to no avail. Any hints on how to control this?
—
did i really confuse that comment with a comment intended for a separate discussion? Yes, yes i did.
Thanks.