
Earlier, we discussed about how to rearrangement the relative relation of buttons in the scope of activity to do a custom auto-wrap layout.
This time, we will also implement such a layout, but using a different approach by customizing a layout class.
The layout class (linear, relative, list, grid, etc), is a subclass of view group, with particular way of placing its child views.
There is a high-level talk about custom components, and this tutorial will bring in more details about how to custom a layout.
There are two essential working functions for the layout function of view group, the onMeasure and the onLayout. The former can be used by parent to determinate the size of the view group, and the later do the place of child.
With these two functions, layout can be well organized between parent and child.
The sample code is composed of below parts:
1. Overwrite View Group Class
In this section, we’ll override a view group class, and implement a simple wrap layout logic.
- In order to get the size of child, measure should be called with proper argument first, then getMeasuredWidth and getMeasuredHeight can return the proper value.
- Child view should not be placed in the padding range of its parent.
- For simplicity, the first added child will be placed first.
public class WrapLayout extends ViewGroup {

@Override
protected void onLayout(boolean changed, int l, int t, int r, int b) {
  // TODO Auto-generated method stub
  final int count = getChildCount();
  int curWidth, curHeight, curLeft, curTop, maxHeight;

  //get the available size of child view
  int childLeft = this.getPaddingLeft();
  int childTop = this.getPaddingTop();
  int childRight = this.getMeasuredWidth() - this.getPaddingRight();
  int childBottom = this.getMeasuredHeight() - this.getPaddingBottom();
  int childWidth = childRight - childLeft;
  int childHeight = childBottom - childTop;

  maxHeight = 0;
  curLeft = childLeft;
  curTop = childTop;
  //walk through each child, and arrange it from left to right
  for (int i = 0; i < count; i++) {
    View child = getChildAt(i);
    if (child.getVisibility() != GONE) {
      //Get the maximum size of the child
      child.measure(MeasureSpec.makeMeasureSpec(childWidth, MeasureSpec.AT_MOST),
                    MeasureSpec.makeMeasureSpec(childHeight, MeasureSpec.AT_MOST));
      curWidth = child.getMeasuredWidth();
      curHeight = child.getMeasuredHeight();
      //wrap is reach to the end
      if (curLeft + curWidth >= childRight) {
        curLeft = childLeft;
        curTop += maxHeight;
        maxHeight = 0;
      }
      //do the layout
      child.layout(curLeft, curTop, curLeft + curWidth, curTop + curHeight);
      //store the max height
      if (maxHeight < curHeight)
        maxHeight = curHeight;
      curLeft += curWidth;
    }
  }
}
}
2. Set Override Class as the Layout
We can change the active_main.xls file to use a custom layout. Just change the pre-created layout entry (such as RelativeLayout) to class path of the custom layout (com.example.layoutoverride.WrapLayout in this example).
<com.example.layoutoverride.WrapLayout xmlns:android="http://schemas.android.com/apk/res/android"
  android:id="@+id/main_relative_layout"
  xmlns:tools="http://schemas.android.com/tools"
  android:layout_width="match_parent"
  android:layout_height="match_parent"
  android:paddingBottom="@dimen/activity_vertical_margin"
  android:paddingLeft="@dimen/activity_horizontal_margin"
  android:paddingRight="@dimen/activity_horizontal_margin"
  android:paddingTop="@dimen/activity_vertical_margin"
  tools:context=".MainActivity">

  <TextView
    android:layout_width="wrap_content"
    android:layout_height="wrap_content"
    android:text="@string/hello_world" />
</com.example.layoutoverride.WrapLayout>
3. Add Test Code for the Layout
To view the layout results, beside the hello world TextView defined in layout xml file, another 10 Buttons are created with text of random length.
public class MainActivity extends Activity {
  Button btns[];
  @Override
  protected void onCreate(Bundle savedInstanceState) {
    super.onCreate(savedInstanceState);
    setContentView(R.layout.activity_main);
    WrapLayout wl = (WrapLayout) this.findViewById(R.id.main_relative_layout);
    btns = new Button[10];
    Random rnd = new Random(System.currentTimeMillis());
    for (int i=0; i<btns.length; i++) {
      btns[i] = new Button(this);
      btns[i].setText(rnd.nextBoolean() ? "LongText" : "TXT");
      wl.addView(btns[i]);
    }
  }
}
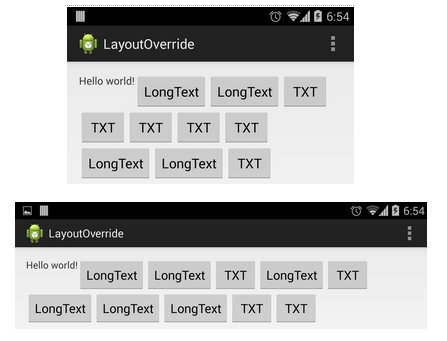
4. Screenshot of the Output
There are two screenshots for the test, and it shows that the wrap works well. As we do not save the text of buttons for rotation event, these two screenshots have different button text.


 My name is Ramesh Natarajan. I will be posting instruction guides, how-to, troubleshooting tips and tricks on Linux, database, hardware, security and web. My focus is to write articles that will either teach you or help you resolve a problem. Read more about
Comments on this entry are closed.
Nice info if you are into mobile apps. But some of the ideas could be usefull, or just to see how are things done on other platforms. Good article for sure.
I tried this example and for some reasons it is not working …. do you have the full source code for this app?
Unfortunately, the onMeasure-method is missing in the code above…
I want to create triangle shape not rectangular.. what should i have to do?