
Zenoss is an open source agentless monitoring tool.
The main advantage of zenoss is that you don’t need to install any software on the client side for monitoring.
Zenoss has the following two versions:
- Zenoss Core (this is free)
- Zenoss Enterprise. This is also called as Zenoss Resource Manager, which is a paid version. This provides several additional features: High-availability, distributed architecture, event correlation, etc.
By default, it uses SNMP for monitoring. On Windows, it uses WMI (Windows Management Instrumentation).
This tutorial explains how to install and configure the Zenoss Core edition for your enterprise monitoring.
1. Pre-Req for Zenoss Install
Before you install ZenOSS, make sure you do the following:
- Open these ports on your firewall, as they are used by Zenoss and its related services: 11211, 8080, 514, 162, 25
- Install Java and make sure JAVA_HOME is set appropriately (Use java version 6 or above)
# java -version
java version "1.6.0_31"
Java(TM) SE Runtime Environment (build 1.6.0_31-b04)

# set | grep JAVA_HOME
JAVA_HOME=/usr/java/default/bin
2. Install Zenoss Dependency Package
Install the zenoss dependencies repository. Download the appropriate version for your platform from here.
# rpm -Uvh zenossdeps-4.2.x-1.el5.noarch.rpm
3. Install MySQL
You can install MySQL as we discussed earlier.
Make sure to set the following parameters in your /etc/my.cnf file after the MySQL installation.
max_allowed_packet=16M
innodb_buffer_pool_size=256M
innodb_additional_mem_pool_size=20M
Also, for now, don’t set any password for the MySQL root account. Leave it empty.
4. Other RPM and Service Dependencies
Depending on your environment, when you install zenoss core rpm as shown in the next step, you might get lot of missing dependencies messages. You have to install all of those missing packages one by one. On my instance, I ended-up installing the following packages
- net-snmp.x86_64 and net-snmp-utils.x86_64
- gmp.x86_64
- sysstat.x86_64
- dmidecode.x86_64
- memcached.x86_64
- binutils.x86_64
- liberation-fonts-common.noarch, liberation-mono-fonts.noarch, liberation-sans-fonts
- rrdtool.x86_64
- Several nagios-plugins packages. For example: nagios-plugins-dig.x86_64, nagios-plugins-dns.x86_64, etc.
- liberation-serif-fonts
- libxslt.x86_64
- libgcj.x86_64
- rabbitmq-server-2.8.6-1.noarch
If you are using ‘Amazon Linux AMI 2013.09.1’, to install libgcj, you need to create a repo file in /etc/yum.reposd.d/centos.repo with following lines:
[centos]
name=CentOS $releasever - $basearch
baseurl=http://ftp.heanet.ie/pub/centos/5/os/$basearch/
enabled=1
gpgcheck=0
Also, make sure the following services are started before installing zenoss:
service memcached start

service snmpd start

service rabbitmq-server start
5. Install Zenoss Core RPM
If you have SELinux enabled, you need to make sure to allow appropriate Zenoss ports and programs in your SELinux configuration. If you are not sure how to do that, you may want to temporarily disable SELinux until you figure out how to do it.
Download the zenosscore RPM package from here.
Install the zenoss core rpm package:
rpm –Uvh zenoss_core-4.2.4-1897.el6.x86_64.rpm
6. Start Zenoss and Verify
Start the zenoss service as shown below:
# service zenoss start
Loading initial Zenoss objects into the Zeo database
When you start the zenoss for the first time, it will take a while, as it will few database schemas like zenoss_zep, zodb and zodb_session. This will also add rabbitmqvhost.
Rabbitmq is an open source messaging queue server which is implemented in latest version of zenoss to process events faster. In the previous versions, Zenoss event processing was done by zenhubdeamon.
Once zenoss is started for the 1st time, connect to the MySQL database and verify that it has created the zenoss realted database schemas:
mysql> show databases;
+--------------------+
| Database           |
+--------------------+
| information_schema |
| mysql              |
| performance_schema |
| test               |
| zenoss_zep         |
| zodb               |
| zodb_session       |
+--------------------+
7 rows in set (0.00 sec)
7. Verify Zenoss Services
Execute the zenoss command as shown below to view the status of all the Zenoss services. It should all say running.
# zenoss xstatus
Status        | PID     | Daemon
----------------------------------------------
Running        23594      zeneventserver
Running        21003      zopectl
Running        22103      zenrrdcached
Running        21036      zenhub
Running        21116      zenjobs
Running        22140      zeneventd
Running        21174      zenping
Running        21206      zensyslog
Running        21238      zenstatus
Running        21271      zenactiond
Running        21307      zentrap
Running        21339      zenmodeler
Running        21371      zenperfsnmp
Running        21727      zencommand
Running        21760      zenprocess
Running        22096      zredis
Verify that the zenoss rabbitmq queues are created using the rabbitmqctl command as shown below.
# rabbitmqctl -p /zenoss list_queues
Listing queues ...
celery  0
zenoss.queues.zep.migrated.summary      0
zenoss.queues.zep.migrated.archive      0
zenoss.queues.zep.rawevents     0
zenoss.queues.zep.heartbeats    0
zenoss.queues.zep.zenevents     0
zenoss.queues.zep.modelchange   0
zenoss.queues.zep.signal        0
...done.
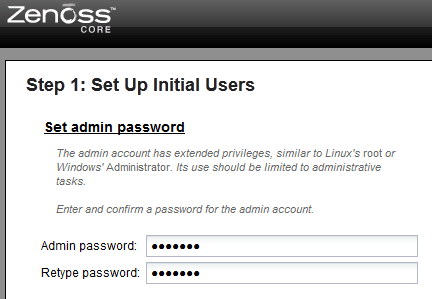
8. Launch Zenoss UI and setup Admin User
Once Zenoss is installed, go to http://{your-ip-address}:8080
For the first time, it will launch a setup screen. Click on “Get Started”. From here, do the following two steps:
- Assign a password for the admin user
- Create a new user account
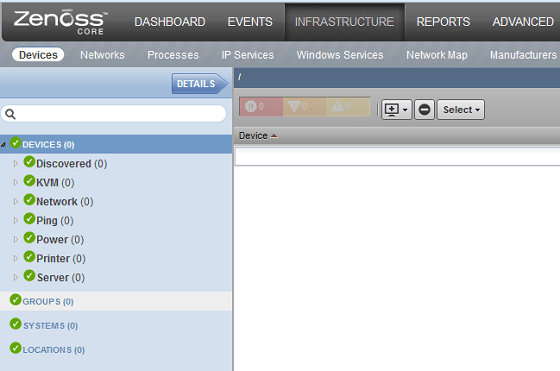
9. Login to Zenoss
After the above setup, login either with the “admin” user or the new user that you’ve created.
Click on the “Infrastructure” link from the top menu. From here, you can start adding the clients and devices that you like to monitor.


 My name is Ramesh Natarajan. I will be posting instruction guides, how-to, troubleshooting tips and tricks on Linux, database, hardware, security and web. My focus is to write articles that will either teach you or help you resolve a problem. Read more about
Comments on this entry are closed.
Hi
Very Interesting! Thanks!
A little nit for you, not on the main contents, but on how you’re checking environment under the first point. That will give a false positive where JAVA_HOME is set in the local shell, but not exported to the environment.
printenv JAVA_HOME
…would do more precisely what you want.
very good..
nice one… good steps