
Domain Name Service (DNS) is an internet service that maps IP addresses to fully qualified domain names (FQDN) and vice versa.
BIND stands for Berkley Internet Naming Daemon.
BIND is the most common program used for maintaining a name server on Linux.
In this tutorial, we will explain how to install and configure a DNS server.
If you are new to DNS, you should first understand the fundamentals of DNS and how it works.
1. Network Information
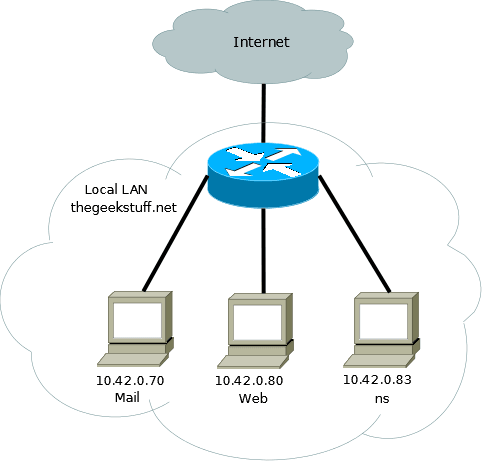
In this tutorial, we are going to setup a local DNS server for the network shown in the below diagram.
We’ll use “thegeekstuff.net” domain as an example for this DNS installation. “mail”, “web”, “ns” are the hosts that resides within this domain.
It is possible to configure a single system to act as a caching name server, primary/master and secondary/slave. We will configure this DNS as a Primay/Master as well as Caching DNS server.
We’ll be installing DNS server on “10.42.0.83”.
2. Install Bind
Install the bind9 package using the appropriate package management utilities for your Linux distributions.
On Debian/Ubuntu flavors, do the following:
$ sudo apt-get install bind9
On Redhat/CentOS/Fedora flavors, do the following:
# yum install bind9
All the DNS configurations are stored under /etc/bind directory. The primary configuration is /etc/bind/named.conf which will include other needed files. The file named /etc/bind/db.root describes the root nameservers in the world.
3. Configure Cache NameServer
The job of a DNS caching server is to query other DNS servers and cache the response. Next time when the same query is given, it will provide the response from the cache. The cache will be updated periodically.
Please note that even though you can configure bind to work as a Primary and as a Caching server, it is not advised to do so for security reasons. Having a separate caching server is advisable.
All we have to do to configure a Cache NameServer is to add your ISP (Internet Service Provider)’s DNS server or any OpenDNS server to the file /etc/bind/named.conf.options. For Example, we will use google’s public DNS servers, 8.8.8.8 and 8.8.4.4.
Uncomment and edit the following line as shown below in /etc/bind/named.conf.options file.
forwarders {
    8.8.8.8;
    8.8.4.4;
};
After the above change, restart the DNS server.
$ sudo service bind9 restart
4. Test the Cache NameServer
You can use the dig command to test DNS services. DIG command examples explains more about how to perform DNS lookups.
$ dig ubuntu.com

;; Query time: 1323 msec
Now when the second time you execute the dig, there should be an improvement in the Query time. As you see below, it took only 3 msec the second time, as it is getting the info from our caching DNS server.
$ dig ubuntu.com

;; Query time: 3 msec
5. Configure Primary/Master Nameserver
Next, we will configure bind9 to be the Primary/Master for the domain/zone “thegeekstuff.net”.
As a first step in configuring our Primary/Master Nameserver, we should add Forward and Reverse resolution to bind9.
To add a DNS Forward and Reverse resolution to bind9, edit /etc/bind9/named.conf.local.
zone "thegeekstuff.net" {
    type master;
    file "/etc/bind/db.thegeekstuff.net";
};
zone "0.42.10.in-addr.arpa" {
        type master;
        notify no;
        file "/etc/bind/db.10";
};
Now the file /etc/bind/db.thegeekstuff.net will have the details for resolving hostname to IP address for this domain/zone, and the file /etc/bind/db.10 will have the details for resolving IP address to hostname.
6. Build the Forward Resolution for Primary/Master NameServer
Now we will add the details which is necessary for forward resolution into /etc/bind/db.thegeekstuff.net.
First, copy /etc/bind/db.local to /etc/bind/db.thegeekstuff.net
$ sudo cp /etc/bind/db.local /etc/bind/db.thegeekstuff.net
Next, edit the /etc/bind/db.thegeekstuff.net and replace the following.
- In the line which has SOA: localhost. – This is the FQDN of the server in charge for this domain. I’ve installed bind9 in 10.42.0.83, whose hostname is “ns”. So replace the “localhost.” with “ns.thegeekstuff.net.”. Make sure it end’s with a dot(.).
- In the line which has SOA: root.localhost. – This is the E-Mail address of the person who is responsible for this server. Use dot(.) instead of @. I’ve replaced with lak.localhost.
- In the line which has NS: localhost. – This is defining the Name server for the domain (NS). We have to change this to the fully qualified domain name of the name server. Change it to “ns.thegeekstuff.net.”. Make sure you have a “.” at the end.
Next, define the A record and MX record for the domain. A record is the one which maps hostname to IP address, and MX record will tell the mailserver to use for this domain.
Once the changes are done, the /etc/bind/db.thegeekstuff.net file will look like the following:
$TTL    604800
@   IN  SOA ns.thegeekstuff.net. lak.localhost. (
             1024       ; Serial
             604800     ; Refresh
              86400     ; Retry
            2419200     ; Expire
             604800 )   ; Negative Cache TTL
;
@   IN  NS  ns.thegeekstuff.net.
thegeekstuff.net.    IN      MX      10      mail.thegeekstuff.net.
ns  IN  A   10.42.0.83
web IN  A   10.42.0.80
mail IN A   10.42.0.70
6. Build the Reverse Resolution for Primary/Master NameServer
We will add the details which are necessary for reverse resolution to the file /etc/bind/db.10. Copy the file /etc/bind/db.127 to /etc/bind/db.10
$ sudo cp /etc/bind/db.127 /etc/bind/db.10
Next, edit the /etc/bind/db.10 file, and basically changing the same options as /etc/bind/db.thegeekstuff.net
$TTL    604800
@   IN  SOA ns.thegeekstuff.net. root.localhost. (
             20         ; Serial
             604800     ; Refresh
              86400     ; Retry
            2419200     ; Expire
             604800 )   ; Negative Cache TTL
;
@   IN  NS  ns.
Next, for each A record in /etc/bind/db.thegeekstuff.net, add a PTR record.
$TTL    604800
@   IN  SOA ns.thegeekstuff.net. root.thegeekstuff.net. (
             20     ; Serial
             604800     ; Refresh
              86400     ; Retry
            2419200     ; Expire
             604800 )   ; Negative Cache TTL
;
@    IN  NS  ns.
83   IN  PTR ns.thegeekstuff.net.
70   IN  PTR mail.thegeekstuff.net.
80   IN  PTR web.thegeekstuff.net.
Whenever you are modifying the file db.thegeekstuff.net and db.10, you need to increment the “Serial” number as well. Typically admin uses DDMMYYSS for serial numbers and when they modify, the change the serial number appropriately.
Finally, restart the bind9 service:
$ sudo service bind9 restart
7. Test the DNS server
Now we have configured the DNS server for our domain. We will test our DNS server by pinging mail.thegeekstuff.net from web.thegeekstuff.net.
If the ping is success, then we have configured the DNS successfully.
You can also use nslookup and dig to test DNS servers.
On web.thegeekstuff.net server, add the following to /etc/resolv.conf
nameserver 10.42.0.83
Now ping, mail.thegeekstuff.net, which should resolve the address appropriately from the DNS server that we just configured.
$ ping mail.thegeekstuff.net

PING mail.thegeekstuff.net (10.42.0.70) 56(84) bytes of data.
64 bytes from mail.thegeekstuff.net (10.42.0.70): icmp_req=1 ttl=64 time=0.482 ms
64 bytes from mail.thegeekstuff.net (10.42.0.70): icmp_req=2 ttl=64 time=0.532 ms


 My name is Ramesh Natarajan. I will be posting instruction guides, how-to, troubleshooting tips and tricks on Linux, database, hardware, security and web. My focus is to write articles that will either teach you or help you resolve a problem. Read more about
Comments on this entry are closed.
Thanks for the article. Really good.
Got some general questions though.
Do we have to run our DNS do host our domains? Any pros/cons?
Thanks,
when i was installing bind9 package using by following command
yum install bind9 (centOs-64bit)
it was giving error like
Setting up Install Process
No package bind9 available.
Error: Nothing to do
yum install bind this is fine what is the difference between them pls can u help me
Thanks And Regards
Ramu Mathi
Great write up, do you have a configuration example using the bind-chroot package as well?
Nice!
yes , chroot env and if possible pls also write running Bind on RedHat as well as how to configure selinux for Bind. That would be super cool!
Ramu Mathi to install bind on centos
yum install bind
the number 9 is the version in centos 6.5
[root@c65ws06 ~]# rpm -qa bind
bind-9.8.2-0.17.rc1.el6_4.6.x86_64
Good getting started article – but nobody should run BIND as a normal service. Please do a follow-up article on setting up Chroot-bind as well as DNSSEC. As always, keep up the good work!
Hi,
Thanks a lot for the article. Really good.
hi,
its really a greate full…
NIce and simple
Thanks a Tonnnnnnnn!!!!
To set up chroot’d bind on a RHEL based distro like CentOS6.
# yum install -y bind bind-chroot
in this directory # /var/named
tar up these directories (dyanamic, data and slaves) move the tar’d directories to
# /var/named/chroot/var/named (untar) then run
# restorecon -FR dynamic data slaves
# chown named:named dynamic data slaves
Now configure the /etc/named.conf
Start up named and you have your chroot’d bind setup.
thanks for the article…great post..!!
Good article on the ‘how?’.
What puzzles me is the ‘why?’.
Why would you want a personal DNS server?
Would it be private or public?
Would it be just a subset of the entirelty of things?
What sort of set-up would have a requirement?
And how much resource would it be likely to take?
And how much resource would it be likely to save?
and I suppose
What additional use could it be put to?
Useful post. Thank you so much indeed.
Is there a reason a “home” user would want to set this up on their LAN? If so, is the complexity worth it? Assuming the goal is to have a handful of computers [talk to each other by hostname rather than IP]. The only other option is to just keep the /etc/hosts file up-to-date on all the hosts I guess.
A lot of reasons why one would want this setup, having host name instead of ip addresses, setting up home labs to study, it is complex to setup.
It is so much better using a ‘name’ instead of an ip address.
Good article.
Unfortunately you don’t say anything about setting up a DNS server for ip version 6. A follow up article about that would be very appreciated
.
Hi
I am new DNS server, i am trying to install DNS server as per your direction but unsuccessful, kindly help me out.
Regards
Deepak
One reason I am looking into doing this is to get around the fact that Android devices do not support mDNS. On Windows and MAC, you can find devices with names like “mydevice.local” because they broadcast their names over mDNS. Unfortunately Android devices don’t support mDNS, but one way around it is to point such devices at a local DNS server that lists your devices. Such a server should also act as an access point and/or bridge to the rest of the internet. Kind of annoying, really; I wouldn’t care if Android did not support mDNS since mDNS is actually a better solution to finding “named” devices on your local network.
Thank you! This was very useful! Can you also show us how to add a wild card entry in the DNS. Does this work with wild card entries too? Eg: All requests to *.vms.net mapped to 1.2.3.4.
Just one tiny mistake
To add a DNS Forward and Reverse resolution to bind9, edit /etc/bind9/named.conf.local.
Should be /etc/bind/….
nice tutorial , i have a question though , how can i use this to define a custom domain for my tumblr , i know to use CNAME but i can get it right
The article is as good as can be.
After all these years I wonder why this dns system must be so awkward. I have built some domains with dns and never liked that.
Instead of all those config and db files there could be just one csv file with columns like ‘mac’, ‘ip’, ‘name’, ‘role’, ‘comment’
Likewise the /etc/hostname file should contain a small csv table for all the NIC cards in the computer containing similar columns as above. It also needs columns for the IP-space connected to the cards. Many computers have different names and roles in different networks and it is awkward to build with the current system.