
In AWS, when you launch any EC2 Linux instance, you should select a key pair for that particular instance.
AWS key pair will be in the standard private key format with .pem file extension
But if you are using PuTTY on your Windows laptop to login to AWS instance, you have a problem.
PuTTY doesn’t support PEM format. PuTTY understands only it’s own PPK format.
PPK stands for Putty Private Key.
So, you should convert your .pem file to .ppk file.
For this conversion, putty provides a tool called PuTTYgen.
1. Download AWS PEM file
In AWS, when you first create a key pair file, that you want to use for your EC2 instances, AWS will allow you to download the PEM file to your local machine. Save this PEM file somewhere on your machine.
In this example, the .pem file I have is called thegeekstuff.pem, which is under C drive.
We’ll be converting this thegeekstuff.pem file to thegeekstuff.ppk and use the .ppk to login to EC2 instance using PuTTY.
BTW, the steps to convert pem to ppk for putty is exactly the same for all the Linux AMI images, including CentOS, RedHat, Ubuntu, SuSE, Fedora, Amazon Linux, etc.
2. Download PuTTYGen
Download PuTTYgen from here.
If you’ve used the PuTTY MSI installer, then all the PuTTY utilities comes with it including puttygen.
If you are already using only putty.exe as a standalone, then you can also download the standalone puttygen.exe
Launch PuTTYgen by double clicking on it.
PuTTYGen is a RSA and DSA key generation utility. But, in our case, we’ll be using this to convert the pem to ppk file.
The main PuTTYGen screen will have the following three sections:
Key Section: This will display the current key that is loaded. i.e The key that you are currently working on. When you first launch the puttygen, this section will say “No Key”.
Actions Section: This section will display all the possible actions that you can perform inside PuTTYGen. The following are the available actions:
- Generate – This will let you generate a brand new public/private key pair
- Load – If you already have an existing private key, you can use that by loading it here
- Save – Once you’ve generated a new key, or loaded an existing key, you can save either the public-key or the private-key to your local machine. Initially the save buttons will be disabled, as we have not loaded a key yet.
Parameters Section: Here you’ll specify the type of key to generate. You have three options here: SSH-1 (RSA), SSH-2 (RSA), SSH-2 DSA. You can also set the value of number of bits for the generated key. By default the type will be SSH-2 (RSA) and 2048-bit.
For our purpose of converting PEM to PPK, leave all the parameters at their default value. i.e SSH-2 (RSA) and 2048 bit.
See also: 10 Awesome PuTTY Tips and Tricks You Probably Didn’t Know
3. Load PEM file to PuTTYGen for Conversion
In the following PuTTYGen main screen, click on “Load” button, and select your AWS PEM file.
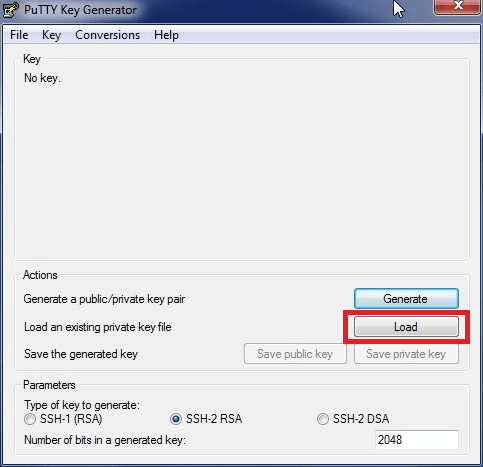
Please note that when you click on “Load”, in the file selection window, by default, it will show “PuTTY Private Key Files (*.ppk)” as the option. Click on this drop-down list and choose “All Files” as shown below. After this, you can browser to the directory where you *.pem file is located, and load it.

Once the *.pem file is loaded, you’ll get a pop-up message saying “Successfully imported foreign key (OpenSSH SSH-2 private key)”. Click on “OK” in this screen.
4. Save your Converted PPK Private Key
Now that we have the keys loaded, you’ll see in the top “Key” section, our key information will be displayed. This will display the key fingerprint, key comment. The key passphrase in this case will be empty, as we didn’t have any passphrase for our AWS PEM file in this example.
Also, in the action section, we’ll see the save button enabled.
Click on the “Save Private Key” button, to save our converted ppk private key.
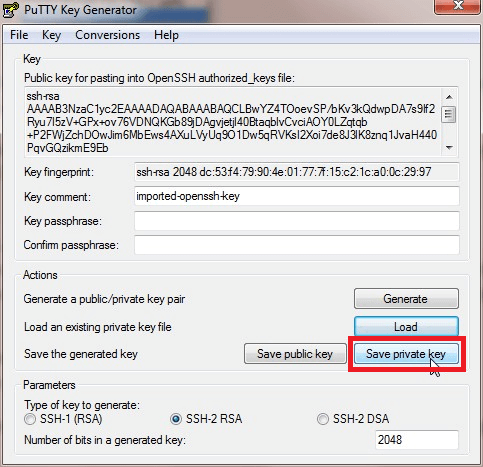
This will display a warning message saying: “Are you sure you want to save this key without a passphrase to protect it?”. Click on “YES”.
Now, give a name to this file. In our case, I’ve named this converted file as thegeekstuff.ppk
5. Use the PPK File in PuTTY
Now, that we have the thegeekstuff.pem AWS PEM file converted to thegeekstuff.ppk PuTTY key file, we can use this to login to our AWS EC2 instance.
For this, launch the putty, and do the following:
First, in the “Host Name (or IP address)” field, enter the public-dns or ip of your AWS EC2 instance.
Second, in the “Saved Sessions” field, enter the name that you would like to give for this AWS-EC2-instance on your putty, and click on “Save” to save this sessions in your putty list.
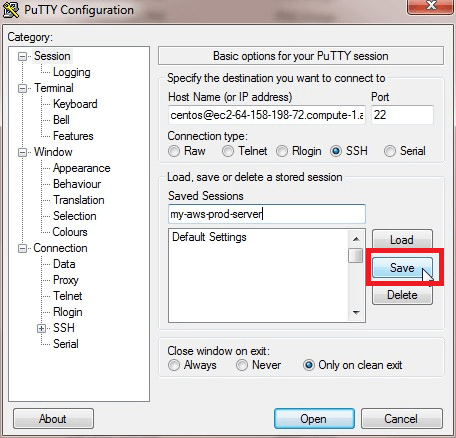
Third, on the left-hand side panel, expand the “Connections” -> expand “SSH” -> select “Auth”. Click on “Browse”, and select your converted ppk file for the “Private key file for authentication” as shown below.

Fourth, at this stage you can click on “Open” to start the connection, but you’ll lose the values that you just entered. So, on the left-panel click on “Sessions” again, and click on “Save” again. This will save the information about the private key that you provided to the putty-session that you saved earlier.
6. PEM and PPK File Formats
Once you’ve converted the file, you can view the content of PEM and PPK file in a text editor, and you’ll see that the content looks different, as they are of different formats.
PEM Key File from Aamazon EC2 (e.g: thegeekstuff.pem)
-----BEGIN RSA PRIVATE KEY-----
MIIEpAIBAAKCAQEAiwcGGeEzqHr0j/2yr95EHcKQwO7P
IL43rY5eNAbWqm5bwr3IgDmNC2aram/j9hVo2XIQzsCY
u3XvCd5SvM56tSb2h+OND6rxkM4pJhPRG/sMehndqsaj
0IkLxgn4xCXU9rQZbWEgryQDnONY6eOyg7vYykI0YdKE
..
..
Ho4cV+2gmeGopyZTj3QfHMKTghilJsMdBCGmYkip1VUT
JU2OSlE82l2k07FSfH8lvLNI7odj1ZUK2OqsD5Pca5hu
Uk7hWJuqSMsfKeU4AKAt7/WdtAUmmoA7eH9dKjXRg1sX
V6I76uLcRHRmPDJVwuUzf4ppX1sLFtAcIwro98ZBGudz
HO4cTkaSwOk6JJD2XcJ4+XgKzLimt/njP3e5y0gzVriy
-----END RSA PRIVATE KEY-----
The PPK file format (e.g: thegeekstuff.pem). This is the file that we converted using PuTTYGen tool. This is the keyfile format that will work on your PuTTY to login to your Amazon AWS EC2 Linux instance using SSH protocol as shown above.
PuTTY-User-Key-File-2: ssh-rsa
Encryption: none
Comment: imported-openssh-key
Public-Lines: 6
AAAAB3NzaC1yc2EAAAADAQABAAABAQCLBwYZ4TOoevSP
u7I5zV+GPx+ov76VDNQKGb89jDAgvjetjl40BtaqblvC
chDOwJim6MbEws4AXuLVyUq9O1Dw5qRVKsI2Xoi7de8J
zikmE9Eb+wx6Gd2qxqPuftJqbGjAzin0+voGlWH18Zeg
tBltYSCvJAOc41jp47KDu9jKQjRh0oSkDQ88l19zXgqp
jhxX7aCZ4ainJlOPdB8cwpOCGKUmwx0EIaZiSKnVVRMU
Private-Lines: 14
AAABAATq1K5pprgY0TmekYli5SngTdplF/PKfbUJKn6c
nj0qPTHoTTCt5T3V9Wzn5YWTg4eZtApptrhnfXPjcvC9
..
..
6PfGQRrnc4CXbW/vxw/K4w7RAp53zs0d3P18EE3i3xzu
Csy4prf54z93uctIM1a4skfy1GFiM3ujTOxskhU5OLXb
Private-MAC: 0827d5872ec564e75b370bc3eb6ddcc


 My name is Ramesh Natarajan. I will be posting instruction guides, how-to, troubleshooting tips and tricks on Linux, database, hardware, security and web. My focus is to write articles that will either teach you or help you resolve a problem. Read more about
Comments on this entry are closed.
Thank you for info. Each step is very indetail.
Great explanation. Very useful…
Very nice solution
Still i am having same issue : Connection Error