
 One of the most powerful feature of git is its ability to create and manage branches in the most efficient way.
This tutorial explains the following git branch command examples:
- Create a New git Branch
- Delete a Git branch
- Delete remote-tracking branches
- Switch to a New git Branch to Work
- Create a New Branch and Switch Immediately
- Working on a Git Branch (Making Changes)
- View all Local git Branches
- View Remote git Branches
- View Merged and Not-Merged Local Git Branch
- Rename a Git Branch
- Force Rename a Git Branch
- Display Git Branch in Color
- Display Full or Partial SHA1 Git Commit Values
- Create a Branch at a Specific Location
- Display Specific Git Branch Details
1. Create a New git Branch
In this example, we have the following three commits on this project so far.
$ git log --oneline --decorate
37351a0 (HEAD, master) Fixed the bug for title display
df27a49 Added question number
b58503b (origin/master) initial commit
As you see from the above output, we don’t have any branches so far. The first line shows that the default HEAD and master are on the latest commit.
Now, let us see create a new branch using the git branch command as shown below.
In this example, we are creating a new git branch called “dev”
git branch dev
After creating the branch, as you see from the following output, the new “dev” branch is pointing to the same commit as where the HEAD is. i.e the 1st line in the following output.
$ git log --oneline --decorate
37351a0 (HEAD, master, dev) Fixed the bug for title display
df27a49 Added question number
b58503b (origin/master) initial commit
If you are new to git, this will give you a jump-start on Linux environment: Introduction to GIT on Linux – Install, Create Project, Commit Files
2. Delete a Git branch
If you’ve created a git branch by mistake, you can delete it using -d option shown below.
The following example will delete the dev git branch that we just created.
$ git branch -d dev
Deleted branch dev (was 37351a0).
In the output, it will also display the commit location where this branch was pointing to before it was deleted.
After the branch is deleted, as you see from the following output, we don’t see it anymore.
$ git log --oneline --decorate
37351a0 (HEAD, master) Fixed the bug for title display
df27a49 Added question number
b58503b (origin/master) initial commit
You can also delete multiple branches using one git branch -d command as shown below.
$ git branch -d dev stage prod
Deleted branch dev (was 37351a0).
Deleted branch stage (was df27a49).
Deleted branch prod (was b58503b).
Please note that -d option will also delete the reflog that are associated with the branch that is deleted.
Note: You can also use -D option (upper-case D) to delete a branch without worrying about the the merged status of the branch. This means that it will delete the given branch even if it doesn’t have all the commit from the master branch.
If you are new to Git, this will help you to get started for Win environment: How to Install GIT for Windows and Create / Clone Remote Repositories
3. Delete remote-tracking branches
When you’ve checked-out a branch from a remote git repository, you can delete that remote tracking branches using -r option along with -d option.
For example, the following will delete the the dev, stage and prod remote-tracking branches.
git branch -d -r origin/dev origin/stage origin/prod
Please keep in mind that you’ll typically do this when these branches doesn’t exist anymore in the remote repository. If these exists in the remote repository, they’ll be pulled again during the next fetch.
4. Switch to a New git Branch to Work
By default when you create a new branch, you’ll still be only on whatever branch you were previously working on.
So, after creating a new branch, if you want to switch to it, use the git checkout command as shown below.
$ git branch dev

$ git checkout dev
Switched to branch 'dev'
Now if you do git status, you can see what you are currently working on the new dev branch that was just created.
$ git status
# On branch dev
nothing to commit (working directory clean)
5. Create a New Branch and Switch Immediately
Instead of creating a branch and then doing a checkout to switch to it using two commands, you can also combine them into single command.
When you use -b option in the git checkout, then it will create the specified branch and switch to it immediately.
As you see below, we just created a branch called ‘qa’ and checked it out immediately.
$ git checkout -b qa
Switched to a new branch 'qa'
The git status show that we are currently working on the newly created qa branch.
$ git status
# On branch qa
nothing to commit (working directory clean)
The above git checkout -b qa command is equivalent to the following two commands.
git branch qa

git checkout qa
Now we have both qa and dev branch pointing to the latest commit as shown below.
$ git log --oneline --decorate
37351a0 (HEAD, qa, master, dev) Fixed the bug for title display
df27a49 Added question number
b58503b (origin/master) initial commit
Git log command is used to view the commit logs as explained in details here: 10 Essential Git Log Command Examples on Linux to View Commits
6. Working on a Git Branch (Making Changes)
So far, we have two git branches created: dev and qa.
Let us go-ahead and work on qa branch. Modify a file and commit it to qa branch.
In this example, we modified the contact.html file, and committing it to the qa branch
$ git checkout qa

$ vi contact.html

$ git add contact.html

$ git commit -m "Changed the contact info"
[qa fea5edd] Changed the contact info
 1 files changed, 1 insertions(+), 1 deletions(-)
When we did the commit, as shown in 1st line of the above output, it also shows which branch it is committing to along with the commit value.
As we see from the git log, we have a new commit, and only qa branch is pointing there. dev branch is still in the previous commit. Our HEAD is pointing to qa branch, as that is where were are currently working.
$ git log --oneline --decorate
fea5edd (HEAD, qa) Changed the contact info
37351a0 (master, dev) Fixed the bug for title display
df27a49 Added question number
b58503b (origin/master) initial commit
7. View all Local git Branches
The following command will display all available local git branches.
$ git branch
  dev
  master
* qa
As we see from the above output, we currently have three branches. A star * in front of the branch name indicates that is our current working branch.
When we use -v option along with git branch, it will display few additional information about the branch.
$ git branch -v
  dev    37351a0 Fixed the bug for title display
  master 37351a0 Fixed the bug for title display
* qa     fea5edd Changed the contact info
In the above output, we also see the sha1 commit value, and the commit subject line of the corresponding git branches.
8. View Remote git Branches
Use the -r option to display all remote-tracking git branches. The following displays the remote tracking git branches only.
$ git branch -r
  origin/master
When we use -a option, it will display both local and remote-tracking git branches as shown below.
$ git branch -a
  dev
  master
* qa
  remotes/origin/master
As you see from the above output, to differentiate between the local and remote, it will have “remotes” keyword in front of the remote git branch.
9. View Merged and Not-Merged Local Git Branch
Use the –merged option which will display all the branches that are already merged.
$ git branch --merged
  dev
  master
* qa
Use the –no-merged option which will display all the branches that are not merged yet.
git branch --no-merged
10. Rename a Git Branch
Use the git branch -m option to rename a branch.
The following example will rename the dev branch to “development”
git branch -m dev development
As you see from the following, the git branch is renamed properly.
$ git branch
  development
  master
* qa
Please keep in mind that if the “dev” branch has a reflog, it will also be renamed. But, a new reflog will be created to indicate that the branch is renamed.
11. Force Rename a Git Branch
In the following example, we’ve created two new branches: 1) hotfix and 2) bug-1099
git branch hotfix

git branch bug-1099
The following displays all of our current local branches.
$ git branch
  bug-1099
  development
  hotfix
  master
* qa
When I tried to rename a branch to a branch name that already exists, we’ll get the following error message.
$ git branch -m bug-1099 hotfix
fatal: A branch named 'hotfix' already exists.
The rename didn’t happen as we still see both “bug-1099” and “hotfix” branch.
$ git log --oneline --decorate
fea5edd (HEAD, qa, hotfix, bug-1099) Changed the contact info
37351a0 (master, development) Fixed the bug for title display
df27a49 Added question number
b58503b (origin/master) initial commit
To forcefully rename a branch, use -M (upper-case M) option as shown below.
git branch -M bug-1099 hotfix
Now, we don’t see bug-1099 anymore, as it is renamed to the existing hotfix branch.
$ git branch
  development
  hotfix
  master
* qa
The following is the git log output of the same.
$ git log --oneline --decorate
fea5edd (HEAD, qa, hotfix) Changed the contact info
37351a0 (master, development) Fixed the bug for title display
df27a49 Added question number
b58503b (origin/master) initial commit
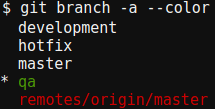
12. Display Git Branch in Color
When you view the branches using color option in the git branch command, it will be shown in appropriate color to distinguish between current branch, local branch and remote branches. They’ll all be in different colors as shown below.
git branch -a --color
If you don’t want to display the color, you can turn it off using –color=never option.
git branch -a --color=never
The possible values for –color parameters are: always, never, auto. The default is always.
You can also specify –no-color option as shown below. Even if you have set the git configuration files to show the color always, this will turn it off. Both of the following commands are exactly the same.
git branch -a --no-color

git branch -a --color=never
13. Display Full or Partial SHA1 Git Commit Values
By default, when you use git branch -v option, it will display the first 7 character of the sha1 commit value for the branch as shown below.
$ git branch -v
  development 37351a0 Fixed the bug for title display
  hotfix      fea5edd Changed the contact info
  master      37351a0 Fixed the bug for title display
* qa          fea5edd Changed the contact info
You can change this behavior and specify how many characters do you want to see for the sha1 value. The minimum you can go is 4. If you specify a value less than 2, it will still display 4 characters minimum as shown below.
$ git branch -v --abbrev=2
  development 3735 Fixed the bug for title display
  hotfix      fea5 Changed the contact info
  master      3735 Fixed the bug for title display
* qa          fea5 Changed the contact info
If you want to display the full SHA1 value, then use –no-abbrev as shown below.
$ git branch -v --no-abbrev
  development 37351a077c826de7af6638b592c8efcad8cbc94e Fixed the bug for title display
  hotfix      fea5edd0b76c61744839f179f953778d8a7a6def Changed the contact info
  master      37351a077c826de7af6638b592c8efcad8cbc94e Fixed the bug for title display
* qa          fea5edd0b76c61744839f179f953778d8a7a6def Changed the contact info
14. Create a Branch at a Specific Location
By default when you create a new branch, it will create the new branch at where the current HEAD is pointing.
But, you can change this behavior and create branch at a different location.
In this example, currently the HEAD, qa and hotfix branch is pointing to the latest commit. i.e fea5edd.
$ git log --oneline --decorate
fea5edd (HEAD, qa, hotfix) Changed the contact info
37351a0 (master, issue1099, development) Fixed the bug for title display
df27a49 Added question number
b58503b (origin/master) initial commit
The following example will create a new branch issue2000 pointing to a different commit than the latest commit. i.e Here we are specifying that this should create this new branch at the specified commit sha1 number df27a49.
git branch issue2000 df27a49
As you see below, the new branch is created at the specified location, instead of the default HEAD location.
$ git log --oneline --decorate
fea5edd (HEAD, qa, hotfix) Changed the contact info
37351a0 (master, issue1099, development) Fixed the bug for title display
df27a49 (issue2000) Added question number
b58503b (origin/master) initial commit
15. Display Specific Git Branch Details
You can also use –contains option and display only specific branch.
In the following example, we have several local branches.
$ git branch -v
  development 37351a0 Fixed the bug for title display
* hotfix      fea5edd Changed the contact info
  issue1099   37351a0 Fixed the bug for title display
  issue2000   df27a49 Added question number
  master      37351a0 Fixed the bug for title display
  qa          fea5edd Changed the contact info
Here we are using the –contains option and searching for only the specified branch name (i.e qa). But, here this is also displaying hotfix branch, because hotfix’s tip commit is a descendant of qa branch.
$ git branch -v --contains qa
* hotfix fea5edd Changed the contact info
  qa     fea5edd Changed the contact info
When you specify invalid branch name, or if you specify a partial branch name, you’ll get the following malformed object error message.
$ git branch -v --contains dev
error: malformed object name dev


 My name is Ramesh Natarajan. I will be posting instruction guides, how-to, troubleshooting tips and tricks on Linux, database, hardware, security and web. My focus is to write articles that will either teach you or help you resolve a problem. Read more about