
If you have PostgreSQL running in your environment, managing it from command-line might be bit difficult as you have to remember all the db commands and syntax.
If you are MySQL DBA, you might notice that there is a slight difference in the syntax for few of the commands in PostgreSQL. Also, some of the DBA concepts in PostgreSQL are slightly different than MySQL.
Using phpPgAdmin, you can pretty much do all PostgreSQL DBA activities from a web-based console. You don’t have to worry about remembering PostgreSQL DBA commands or syntax.
This tutorial explains how to install and configure phpPgAdmin tool to manage PostgreSQL from a web interface.
Note: If you are using MySQL database on your environment, you can install phpMyAdmin to manage your MySQL database from a web console: 5 Steps to Install phpMyAdmin on Linux
1. Install PHP and Apache
For phpPgAdmin tool, you need to have Apache and PHP already running on your environment.
You can install Apache from yum, or download and install Apache from source code.
In the same way, you can install PHP from yum, or download and install PHP from source code.
To verify whether your system already has PHP installed and configured for web access, place the following file in your document root and access it using the ip-address of your server.
# cat test.php
<?php phpinfo(); ?>
Access the above test.php using the following URL of your server to verify PHP installation.
http://{your-ip-address}/test.php
2. Download phpPgAdmin
Download the phpPgAdmin from here, and move it to your server. Or, use wget and download it directly on your server as shown below.
The current stable version is 5.1.
cd ~

wget http://downloads.sourceforge.net/phppgadmin/phpPgAdmin-5.1.tar.gz
The latest phpPgAdmin supports most versions of PostgreSQL DB including 8.4.x and all 9.x.y (9.1.21, 9.2.16, etc, ).
3. Move phpPgAdmin to Apache DocumentRoot
After downloading the file, untar it as shown below.
Move the phpPgAdmin-version-number directory to your Apache’s DocumentRoot directory as phpPgAdmin (i.e without the version-number) as shown below.
tar xvfz phpPgAdmin-5.1.tar.gz

mv phpPgAdmin-5.1 /var/www/html/phpPgAdmin
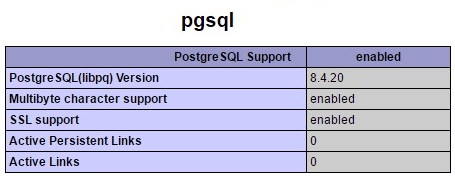
4. Install PHP pgsql Support
Your PHP should have pgsql support. When you go to your http://{your-ip-address}/test.php you should see pgsql option as shown below.
If you don’t see the above, install the appropriate pgsql support for your PHP.
If you have installed PHP from source, you should recompile PHP using –with-pgsql option.
If you have installed PHP using yum, then you should install the php-pgsql package as shown below.
yum install php-pgsql
After the above, make sure you restart the apache using one of the following method depending on your environment.
systemctl restart httpd

service httpd restart

/usr/local/apache2/bin/apachectl restart
If you don’t have pgsql, you’ll get this error message when you try to access phpPgAdmin from web: Your PHP installation does not support PostgreSQL. You need to recompile PHP using the –with-pgsql configure option.
5. Modify PostgreSQL postgresql.conf File
For the phpPgAdmin to work properly, you should also make few changes to the postgresql.conf file.
If you are running phpPgAdmin (Apache/PHP) on a server that is different than the server that is running PostgreSQL server, then you should modify the postgresql.conf file on the PostgreSQL server, and change the listen_address.
By default, this will be set to localhost. Change the value from localhost to * for listen_address parameter in the postgresql.conf file as shown below.
# vi /var/lib/pgsql/data/postgresql.conf
listen_addresses = '*'
After the above change, restart your PostgreSQL database.
6. Modify PostgreSQL pg_hba.conf File
By default, you’ll see something like the following in your pg_hba.conf file:
# cat /var/lib/pgsql/data/pg_hba.conf
local   all         postgres                          ident
local   all         all                               ident
host    all         all         127.0.0.1/32          ident
host    all         all         ::1/128               ident
You can either change the “ident” option to “md5” for all of the above lines, or just specify “md5” option only for your server’s ip-address that you are using to call the phpPgAdmin web URL.
I added the following line to pg_hba.conf file, as I’ll be calling the phpPgAdmin web URL using the internal ip-address of this server, which is 192.168.101.2.
# vi /var/lib/pgsql/data/pg_hba.conf
host    all         all         192.168.101.2/32          md5
Possible options for the last column in the pg_hba.conf files are: trust, md5, password, reject, gss, sspi, krb5, ident, pam, ldap, cert.
In our case, we are using md5, as we want to login through the phpPgAdmin web console using a valid username and password.
If you are running into issues and getting “Login failed” error message from the GUI, you can set “trust” as value for the last column in the pg_hba.conf file, which will run in “trust” mode, which will not ask for password when you login from the phpPgAdmin GUI. Use this only for testing purpose.
Another thing to note is that when you set it to “md5”, when you are starting the PostgreSQL, you may have to give a password, or it will fail to start. In that case, you can use a .pgpass file that contains the password, which will make the postgresql service start without any issues.
7. Modify phpPgAdmin config.inc.php File
config.inc.php is the phpPgAdmin’s config file. This is located under /var/www/html/phpPgAdmin/conf directory. Or, wherever you extracted the phpPgAdmin tar file.
Modify the extra_login_security parameter in config.inc.php file and set it to false as shown below.
# cd /var/www/html/phpPgAdmin

# vi conf/config.inc.php
$conf['extra_login_security'] = false;
If you don’t set the above to false, you might get this error message: Login disallowed for security reasons
By default extra_login_security will be set to true, which will not allow you to login from phpPgAdmin web console using these username: root, postgres, pgsql, administrator.
Another parameter to change in this config file is $conf[‘servers’][0][‘host’]. Set this to ‘localhost’ (or) You can also set this to the ip-address of your server. i.e The ip-address that you’ll be using from your browser to call the phpPgAdmin web console.
By default, the above parameter will be set to ”, which means access will be allowed for UNIX domain socket. Setting this to ‘localhost’ or the ip-address will allow access for TCP/IP connection.
8. SELinux Configuration for phpPgAdmin
If you are running SELinux on your system, you might get some error messages while logging in from the web console.
First, set the appropriate SELinux context to the phpPgAdmin files that is located under Apache’s document root directory.
In this example, as you see below, the SELinux context for phpPgAdmin is admin_home_t, which is wrong.
# cd /var/www/html

# ls -lZ
drwxr-xr-x. root root unconfined_u:object_r:admin_home_t:s0 phpPgAdmin
Use restorecon command to restore the SELinux context to the correct default values as shown below.
In this example, restorecon sets this to sys_content_t type, which is the correct SELinux context for the phpPgAdmin directory and all it’s files and subdirectory underneath.
# restorecon -R phpPgAdmin/

# ls -lZ
drwxr-xr-x. root root unconfined_u:object_r:httpd_sys_content_t:s0 phpPgAdmin
Also, make sure the httpd_can_network_connect_db SELinux boolean value is set to 1 using the setsebool command as shown below.
setsebool -P httpd_can_network_connect_db 1
9. Login to phpPgAdmin Web Console
Finally, access the phpPgAdmin Web UI using this URL: http://{your-ip-adderss}/phpPgAdmin/
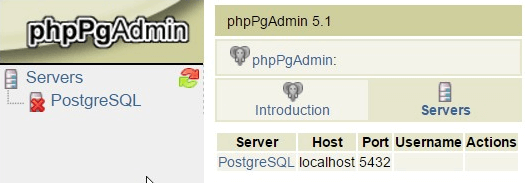
On the top, you’ll see “Introduction” and “Servers” Tab. Click on “Servers” TAB, which will display all the postgreSQL servers managed by this phpPgAdmin GUI.
In this example, we have only one server as shown below.
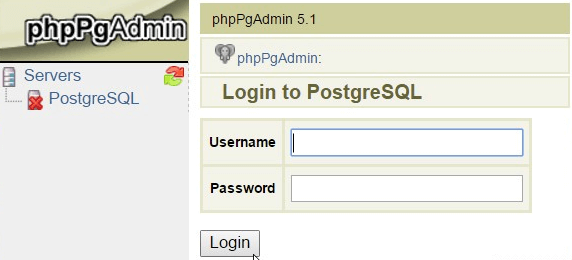
Next, it will display the following Login box. Enter the username and password here.
This should be username and password on the system where the postgreSQL is running. The username you enter here should have access to execute the postgreSQL commands.
10. Manage PostgreSQL DB from Web Console
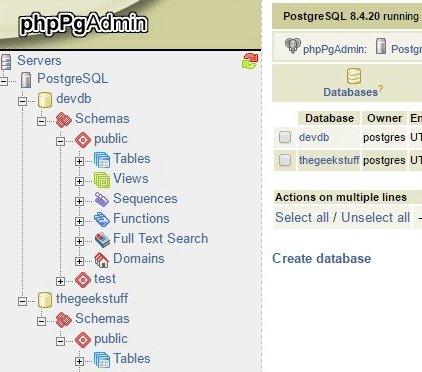
Once you login, on the top, you’ll see four different tabs: 1) Databases 2) Roles 3) Tablespace 4) Export.
By default, it will on Database tab, which will list all the available postgreSQL database in the system.
On this system, it has two postgreSQL databases as shown below: 1) devdb 2) thegeekstuff

Also, on the left-side panel, it will display a tree structure where you can quickly navigate to a particular object (table, or view, or index, or sequence, or function) on a database schema very quickly.


 My name is Ramesh Natarajan. I will be posting instruction guides, how-to, troubleshooting tips and tricks on Linux, database, hardware, security and web. My focus is to write articles that will either teach you or help you resolve a problem. Read more about
Comments on this entry are closed.
adminer supports PostgreSQL along with MySQL and it is easy to set-up using docker container…
https://hub.docker.com/r/clue/adminer/
Nice write up. One thing I might suggest is running phppgadmin code directly from git master on github. We practice continous delivery and don’t always have cycles to release often, so that code is possible more useful.