
Jenkins is an open source automation server, which will help you to build, deploy and automate your enterprise application.
In Jenkins, after the install, it will launch a setup wizard and walk you through the initial security setup.
But, if you like to create user accounts and restrict their privileges, you need to setup appropriate Jenkins security authorization.
This tutorial covers the following two aspects of Jenkins Security:
- Initial Security Setup Wizard – This happens the first time after you install Jenkins, which will help you setup basic security.
- Project-based Matrix Authorization Setup – This explains how to create users, and assign them privileges in Jenkins. For example, developers should only be able to build or configure an existing job (or create a new job if you assign that privilege to developers).
Section I: Initial Security Setup Wizard
1. Unlock Jenkins
Jenkins by default will be installed on port 8080. The first time when you go to the Jenkins Admin UI ( http://{your-ip-address}:8080 ), you’ll see “Unlock Jenkins” screen as part of the “Getting Started” security setup wizard by Jenkins. This will say: “To ensure Jenkins is securely setup by the administrator, a password has been written to the log and this file on the server.”
So, during the Jenkins installation, it create the following file where the initial one-time use admin password is located.
# cat /var/lib/jenkins/secrets/initialAdminPassword
014d281da66f441a9149ce40cfb0074b
Copy and paste the password to unlock the initial screen.
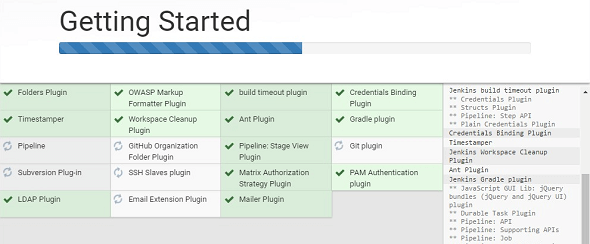
2. Install Jenkins Suggested Plugins
Jenkins is a plugin based architecture and lot of build related functionalites are provided through plugins.
From this “Customize Jenkins” screen, you can either install the suggested plugins, or manually choose the plugins to be installed. I recommend that you choose “Install suggested plugins”.
The following plugins are installed as part of the “Install suggested plugins” selection:
- Folders plugin
- Timestamper
- Pipeline
- Subversion Plug-in
- LDAP Plugin
- OWASP Markup Formatter Plugin
- Workspace Cleanup Plugin
- GitHub Organization Folder Plugin
- SSH Slaves Plugin
- Email Extension Plugin
- Build timeout plugin
- Ant Plugin
- Pipeline: Stage View plugin
- Matrix Authorization Strategy Plugin
- Mailer Plugin
- Credentials Binding Plugin
- Gradle Plugin
- Git Plugin
- PAM Authentication Plugin
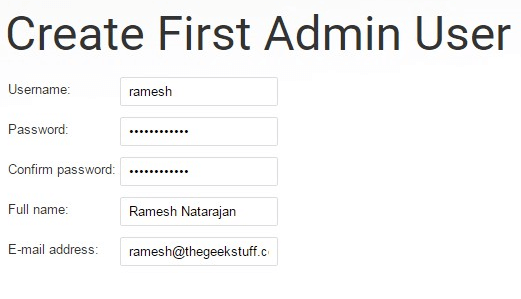
3. Create First Admin User
After installing the plugins, the setup wizard will allow you to create the administrator user. Just like you would expect, whatever username you create here will have full admin privileges and can do pretty much everything from Jenkins UI.
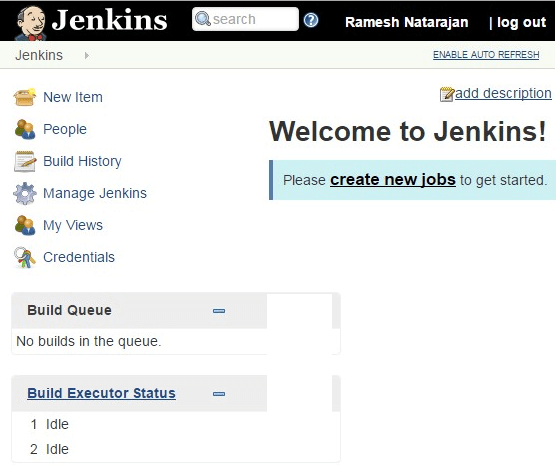
Now you’ll see “Jenkins is Ready” screen. Click on the “Start using Jenkins” button from this screen, which will take you to the Jenkins Welcome screen. Or, you can directly go to this URL: your-ip-address:8080 to login to Jenkins with your admin username.
4. Jenkins Home
Now login to Jenkins using the above admin username and password. From here, you can create your first Jenkins job by clicking on “Create a new job”, or you can setup security or configure Jenkins by click on the “Manage Jenkins” link on the left side menu.
Section 2: Project-based Matrix Authorization Setup
1. Manage Jenkins
To setup the project-baesd matrix authorization, click on the “Manage Jenkins” link on the left side menu items. Which will show you the following screen.
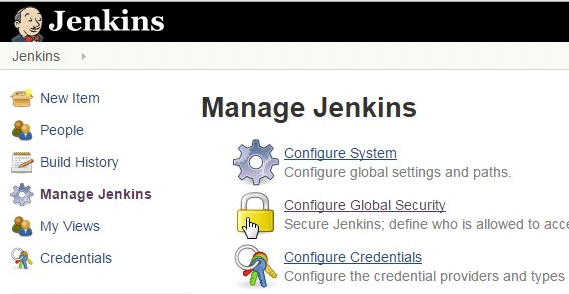
2. Configure Global Security
From the Manage Jenkins, click on “Configure Global Security Option”, which will display the following security configuration screen.
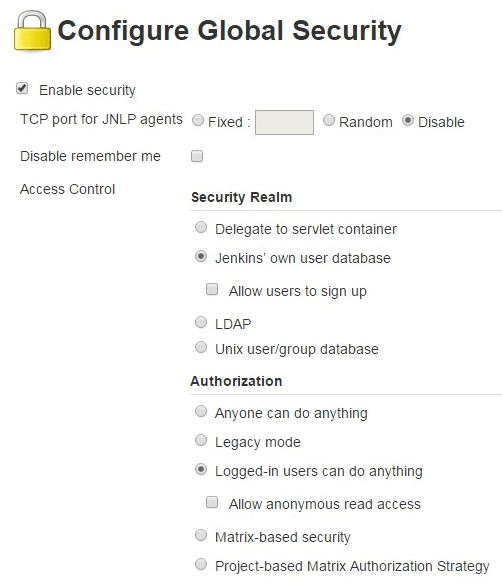
Under the “Authorization” section, by default, “Logged-in users can do anything” option is selected.
As the name suggests, anybody who has an account in Jenkins can login and do anything they want, as they’ll have full control. In this mode, anonymous user gets to only read everything. This option is good if you are setting up a public-facing Jenkins.
But if you are setting up Jenkins for your organization use, where you want developers to build and deploy applications on your servers, you may not prefer this option.
So, to setup project-based security where you can assign the privileges to the individual user, click on “Project-based Matrix Authorization Strategy”.
3. Project-based Matrix Authorization Strategy
Project-based Matrix authorization stragey is an extension to “Matrix-based security”, where you can setup ACL to individual projects. This means that you can allow a specific user to access only certain projects.
The moment you click on the “Project-based Matrix Authorization Strategy” radio-button, it will dispaly the following table right below it where you can add users and assign them individual privileges by clicking on the check-box.
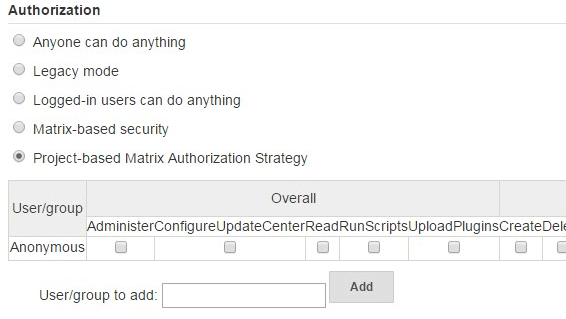
4. Project-based Matrix Authorization Privileges
The following are the various privileges that are available under Project-based Matrix Authorization Strategy.
There are 7 privilege groups. Within each privilege groups, there are individual privleges that you can assign to a specific user or group.
The following explains what these individual privileges means. It is very important for you to understand what exactly each privilege means before assigning it to an user.
Privilege Group 1: Overall
- Administer – This permission grants the ability to make system-wide configuration changes, as well as perform highly sensitive operations that amounts to full local system access (within the scope granted by the underlying OS.)
- ConfigureUpdateCenter – This permission allows a user to configure update sites and proxy settings
- Read – The read permission is necessary for viewing almost all pages of Jenkins. This permission is useful when you don’t want unauthenticated users to see Jenkins pages: revoke this permission from the anonymous user, then add “authenticated” pseudo-user and grant the read access.
- RunScripts – Required for running scripts inside the Jenkins process, for example via the Groovy console or Groovy CLI command.
- UploadPlugin – This permission allows a user to upload arbitrary plugins
Privilege Group 2: Credentials
- Create – The create permission is necessary to add credentials to a credentials provider.
- Delete – The delete permission is necessary to remove credentials stored in a credentials provider.
- Manage Domains – The manage domains permission is necessary to add/remove/configure the credential domains of a credentials provider (where the credentials provider supports multiple credential domains).
- Update – The update permission is necessary to modify credentials in a credentials provider.
- View – The view permission is necessary to view the credentials stored in a credentials provider.
Privilege Group 3: Agent
- Build – This permission allows users to run jobs as them on agents.
- Configure – This permission allows users to configure agents.
- Connect – This permission allows users to connect agents or mark agents as online.
- Create – This permission allows users to create agents.
- Delete – This permission allows users to delete existing agents.
- Disconnect – This permission allows users to disconnect agents or mark agents as temporarily offline.
Privilege Group 4: Job
- Build – This permission grants the ability to start a new build.
- Cancel – This permission grants the ability to cancel a scheduled, or abort a running, build.
- Configure – Change the configuration of a job.
- Create – Create a new job.
- Delete – Delete a job.
- Discover – This permission grants discover access to jobs. Lower than read permissions, it allows you to redirect anonymous users to the login page when they try to access a job url. Without it they would get a 404 error and wouldnt be able to discover project names.
- Read – See a job. (You may deny this permission but allow Discover to force an anonymous user to log in to see the job.)
- Workspace – This permission grants the ability to retrieve the contents of a workspace Jenkins checked out for performing builds. If you don’t want a user to access files in the workspace (e.g. source code checked out from SCM or intermediate build results) through the workspace browser, you can revoke this permission.
Privilege Group 5: Run
- Delete – This permission allows users to manually delete specific builds from the build history.
- Replay – Ability to perform a new Pipeline build with an edited script.
- Update – This permission allows users to update description and other properties of a build, for example to leave notes about the cause of a build failure
Privilege Group 6: View
- Configure – This permission allows users to change the configuration of views.
- Create – This permission allows users to create new views.
- Delete – This permission allows users to delete existing views.
- Read – This permission allows users to see views (implied by generic read access).
Privilege Group 7: SCM
- Tag – This permission allows users to create a new tag in the source code repository for a given build.
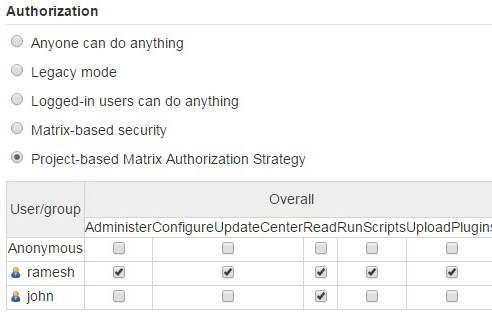
5. Assign everything for the Admin user
This is important. If you don’t do this, you’ll get yourself (the admin user) locked out of the system when you click on “Save” in this Security screen. Also, if you don’t do this, you’ll get “user is missing the Overall/Read permission” error message when you try to click on any page even as admin user.
In the “User/group to add”, type the admin username. I.e The admin username that you created during the Jenkins intial setup, and click on Add.
This will add the admin user (for example: ramesh) to the “Project-based matrix authorization” table. From here, click on the all the individual check-boxes. This means that I’m assigning all the privileges to the username ramesh, who is the admin user.
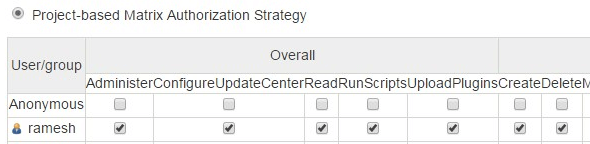
After assigning those permissions, click on the “Save” button to save the changes.
Note: By mistake if you’ve clicked on “save” without giving admin user full-permission and got yourself locked-out of Jenkins, please leave a comment, and I’ll let you know to fix that issue.
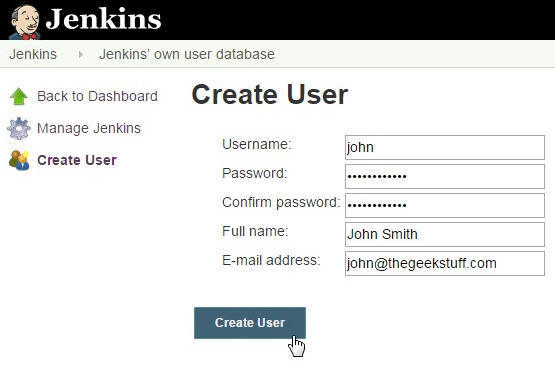
6. Create Jenkins User
Next, if you want to assign certain privilege to individual users, follow the steps below. For example, let us create user account for a developer (john smith) who should have appropriate privileges to build a Jenkins job.
In this case, we should first create a username for John in Jenkins.
Click on the “Manage Jenkins” link on the left-side, and then click on “Manage Users”.
This will take you to a page that will list all available users. Click on “Create User” link on the left side from this users page.
From here, create an user account for John by filling-out the following details.
7. Add User to Project-based Matrix Authorization
Go to: Jenkins -> Manage Jenkins -> Configure Global Security Option -> Under the “Authorization” section -> “Project-based Matrix Authorization Strategy” should already be selected -> You should already see the admin user here with all the privileges.
In the “User/group to add”, type “john” and click on “Add”, this will add john to the privileges table as shown below.
From here, select the privileges that you want to assign to John. If you are creating an account for a developer who will configure and run a Jenkins job, I recommend that you assign the following privileges. In this example, for John, I’ve assigned the following privileges.
- Overall – Read
- Job – Build, Configure and Read
Again, note how I’ve assigned ALL privileges to user ramesh (who is the admin user), and then I assigned only specific privileges to John.
After this, click on Save to save this new configuration.
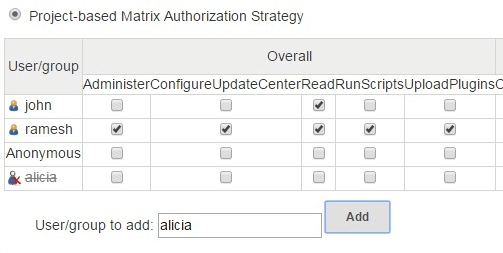
8. Assigning Privileges to non-existing User
Also, if you try to add a user who doesn’t exist to the Matrix authorization table, you’ll notice that the username will be added, but it will be crossed-out as shown in the screenshot below. In this example, we don’t have username alicia created in the system yet.
Jenkins will still let you assign privilege to an user who doesn’t exist yet. You just have to go the Manage User section and add this user later.
9. Login with Developer Account
When John login to Jenkins, he’ll not see “Manage Jenkins” or Credential options, as those are only for administrator.
If administrator has already created a job, then john will be able to run that job (build and deploy), and make changes to that job configuration.


 My name is Ramesh Natarajan. I will be posting instruction guides, how-to, troubleshooting tips and tricks on Linux, database, hardware, security and web. My focus is to write articles that will either teach you or help you resolve a problem. Read more about
Comments on this entry are closed.
Hi!
I was setting this up and then pressed while adding a user by accident. There was only the anonymous group with no permissions set at the time. Now it saved the permissions and I am locked out. Removing the tag from the config.xml doesn’t help. How can I let myself back in?
Thanks 🙂
@Cas I had the same. Followed these steps and it allowed me to get back in to Jenkins: here
In my case the reason that I was locked out was my username is ‘gary’ (lower case ‘g’) but I had entered into the matrix the username as ‘Gary’ (upper case ‘G’)
The GUI still showed an avatar like it had resolved my name, but I guess this is a case-insensitive lookup, whereas the authentication pipeline is probably doing a case-sensitive comparison.
Works fine for me now with all Anonymous access disabled
From the above I understand how to setup users with specific privileges, but I am still missing how to assign users with specific privileges with respect to projects. How would we configure John to see but nothing about ?
If I give READ access to Anonymous, anyone who doesnt log in, is still not able to read/view the job’s configuration. Only job’s build logs are viewable. Is this expected ?
Hi Ramesh,
Thanks for all the info you’ve been posting. Googling stuff often redirects me to your pages. On matrix-based security set up in jenkins, if I give READ access to Anonymous, anyone who doesnt log in, is still not able to read/view the job’s configuration. Only job’s build logs are viewable. Is this expected ?
thanks a lot I found my password 🙂
I saved permissions with out giving admin user full permission. Now I can’t able to login.So can you please send the setting to fix the problem and I cannot reinstall it.
Please help me.
you will have to reset security manually to re-gain access back. here
I have faced the locked out issue. Could you let me know what is the fix to get it back.
hi! Thanks a lot for the tutorial. I have a question? How can I make a new have a default configuration? Besides, how can I make users edit and build just the jobs he created? Many thanks,
I have added logged in (admin) in jerkins without giving any permissions in project based matrix authorizations and save it . then got locked by jerkins .
When I re-installed Jerkins , No Home Dir is there so not able to solve problem