
 389 Directory Server is a super fast open source enterprise LDAP Server.
In this tutorial, we’ll explain how to install and configure the LDAP client on Linux which will talk to your 389 directory server.
Install EPEL
On your client machine, make sure you have EPEL repository setup, as we’ll be downloading the ldap related packages from EPEL.
First, download the latest EPEL package from fedora project website:
# wget http://dl.fedoraproject.org/pub/epel/7/x86_64/e/epel-release-7-10.noarch.rpm
Next, install the EPEL rpm on your client machine.
# rpm -ivh epel-release-7-10.noarch.rpm
Verify /etc/hosts
Make sure your hosts file is setup properly.
In this example, the following is the current /etc/hosts file setup. In this example, we have the 389 directory server installed on deploy
# cat /etc/hosts
127.0.0.1   localhost localhost.localdomain localhost4 localhost4.localdomain4
::1         localhost localhost.localdomain localhost6 localhost6.localdomain6
192.168.101.10  deploy.thegeekstuff.com deploy
If you are new to 389 directory server, refer to our previous tutorial where we explained in detail about how to install LDAP 389 Directory Server On Linux.
Install the LDAP Client libraries
For the LDAP client libraries, we need to install the following packages:
- openldap – This contains LDAP support libraries
- openldap-devel.x86_64 – This contains LDAP development libraries and header files
- nss-pam-ldapd – This is the nsswitch module which uses directory servers
Install the above packages using yum as shown below:
# yum install nss-pam-ldapd.x86_64 openldap.x86_64 openldap-devel.x86_64
Apart from installing the above three packages, depending on your current system configuration, yum might also install the following dependent packages:
- cyrus-sasl
- cyrus-sasl-devel
- nscd
Configure LDAP Client Authentication Resources
To configure the LDAP client authentication resources, we can use any one of the following tools:
- authconfig – The command line tool to configure authentication resources
- authconfig-tui – An GUI based tool to configure the auth resources
To launch the GUI version, execute the following command:
# authconfig-tui
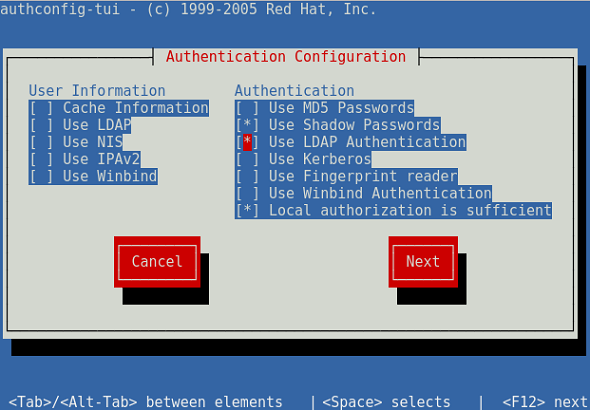
This will bring-up the following user interface:
Use the arrow keys and select “Use LDAP Authentication” check-box as shown below. To select a check-box, press the space bar.
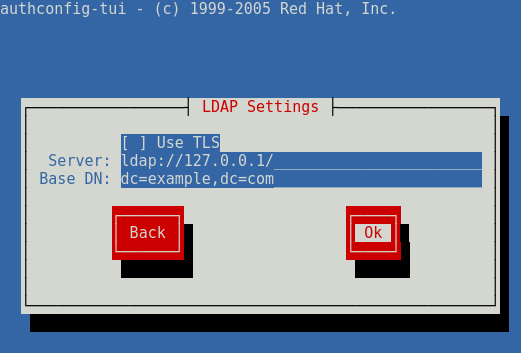
In the next screen, set your LDAP server and base DN accordingly. These values should correspond to your installation of 389 directory server. Please refer to our 389 directory server installation tutorial for more details on this.
Start Name Services related Services for LDAP Client
First make sure nslcd Naming Services LDAP client daemon is up and running. If this is not up, start it accordingly.
# systemctl start nslcd

# systemctl status nslcd
? nslcd.service - Naming services LDAP client daemon.
   Loaded: loaded (/usr/lib/systemd/system/nslcd.service; enabled; vendor preset: disabled)
   Active: active (running) since Sun 2017-10-08 15:15:58 UTC; 7min ago
  Process: 2624 ExecStart=/usr/sbin/nslcd (code=exited, status=0/SUCCESS)
 Main PID: 2625 (nslcd)
   CGroup: /system.slice/nslcd.service
           +-2625 /usr/sbin/nslcd

Oct 08 15:15:58 192.168.101.10 systemd[1]: Starting Naming services LDAP client daemon....
Oct 08 15:15:58 192.168.101.10 systemd[1]: PID file /var/run/nslcd/nslcd.pid not readable (yet?) after start.
Oct 08 15:15:58 192.168.101.10 nslcd[2625]: version 0.8.13 starting
Oct 08 15:15:58 192.168.101.10 nslcd[2625]: accepting connections
Oct 08 15:15:58 192.168.101.10 systemd[1]: Started Naming services LDAP client daemon..
..
..
Next, start nscd Name service caching daemon as shown below using systemctl command.
# systemctl start nscd

# systemctl status nscd
? nscd.service - Name Service Cache Daemon
   Loaded: loaded (/usr/lib/systemd/system/nscd.service; disabled; vendor preset: disabled)
   Active: active (running) since Sun 2017-10-08 15:27:23 UTC; 3s ago
  Process: 2693 ExecStart=/usr/sbin/nscd $NSCD_OPTIONS (code=exited, status=0/SUCCESS)
 Main PID: 2694 (nscd)
   CGroup: /system.slice/nscd.service
           +-2694 /usr/sbin/nscd

Oct 08 15:27:23 192.168.101.10 nscd[2694]: 2694 monitoring file `/etc/hosts` (4)
Oct 08 15:27:23 192.168.101.10 nscd[2694]: 2694 monitoring directory `/etc` (2)
Oct 08 15:27:23 192.168.101.10 nscd[2694]: 2694 monitoring file `/etc/resolv.conf` (5)
Oct 08 15:27:23 192.168.101.10 nscd[2694]: 2694 monitoring directory `/etc` (2)
Oct 08 15:27:23 192.168.101.10 nscd[2694]: 2694 monitoring file `/etc/services` (6)
Oct 08 15:27:23 192.168.101.10 nscd[2694]: 2694 monitoring directory `/etc` (2)
Oct 08 15:27:23 192.168.101.10 nscd[2694]: 2694 disabled inotify-based monitoring for file `/etc/netgroup': No such file or directory
Oct 08 15:27:23 192.168.101.10 nscd[2694]: 2694 stat failed for file `/etc/netgroup'; will try again later: No such file or directory
Oct 08 15:27:23 192.168.101.10 nscd[2694]: 2694 Access Vector Cache (AVC) started
Oct 08 15:27:23 192.168.101.10 systemd[1]: Started Name Service Cache Daemon.
..
..
Setup SSSD and PAM LDAP Configuration
Execute the following authconfig command to setup the SSSD authentication configuration as shown below. This will also make sure you are getting user home directory accordingly for the LDAP client.
# authconfig --enableldapauth --enablemkhomedir \
  --enablesysnetauth --enablelocauthorize \
  --ldapserver=ldap://deploy.thegeekstuff.com \
  --ldapbasedn="dc=thegeekstuff,dc=com" --update
Please note that the SSSD service will be enabled and started during by the authconfig when two of the following are satisfied:
/etc/sssd/sssd.conf file exists, or atleast it is already configured using the implicit SSSD support
SSSD authentication is enabled, which means that pam_sss.so module is referred in PAM configuration
SSSD is enabled for user identity, which means that nsswitch.conf file has reference to sss
Execute the following authconfig command to setup PAM configuration as shown below.
# authconfig --enableldap --enableldapauth \
  --enablemkhomedir --enablesysnetauth \
  --enablelocauthorize \
  --ldapserver="deploy.thegeekstuff.com" \
  --ldapbasedn="dc=deploy,dc=thegeekstuff,dc=com" \
  --update
The following are some of the files that will get affected during the authconfig change:
- /etc/nscd.conf
- /etc/nslcd.conf
- /etc/openldap/ldap.conf
- /etc/pam.d/system-auth
- /etc/pam.d/password-auth-ac
- /etc/nsswitch.conf
The following optiosn are used in the above authconfig command:
- –enableldapauth will configure authentication functions via /etc/pam.d/system-auth
- –enableldap options will configure user information services in /etc/nsswitch.conf
- –enablesysnetauth option will allow authentication of system accounts that has uid < 500.
- –enablelocauthorize option will allow to bypass checking network authentication services for authorization
- –update option will make sure that all the configuration files are modified based on the specified command line options


 My name is Ramesh Natarajan. I will be posting instruction guides, how-to, troubleshooting tips and tricks on Linux, database, hardware, security and web. My focus is to write articles that will either teach you or help you resolve a problem. Read more about
Comments on this entry are closed.
Normally the anonymous bind is permitted on ldap which can lead to allowing listing of available user names.
Many links are suggesting to change it to make it secure.
e.g. : https://access.redhat.com/documentation/en-us/red_hat_enterprise_linux/6/html/identity_management_guide/disabling-anon-binds
If we disable the anonymous bind on 389 server the authentication from client side stops working.
What change should be configured so that the user list is not displayed but still the authentication from a client node will still work properly.